Emacs Mini Manual (PART 1) - THE BASICS
Table of Contents
- Why Emacs?
- Why this guide?
- A bit of history
- "I don't want a complicated editor, I want something simple like Notepad"
- Installation
- Swap Control and Capslock
- Concepts
- Command
- Emacs Key Notation
- Emacs Keys are easy to remember
- Ask for help - from Emacs
- Point
- Opening files
- Ido mode
- Buffer
- Major mode
- Minor mode
- Basic buffer managements
- Bookmark: save locations across Emacs sessions
- Basic motion commands
- Useful built-in key bindings for navigating pairs
- Basic editing commands
- Dynamic Abbreviations
- Kill ring
- Mark and region
- Mark ring
- Global mark ring
- Undo/redo
- Search for text
- Modeline
- Minibuffer
- Echo area
- Frames
- Window
- Prefix Arguments
- Basic file management with Dired
- Registers
- Macro
- Version Control
- Shell
- Project: Browsing Linux kernel source code like a pro
- Extending Emacs Primer
- Conclusion
- Appendix
Before we start:
- Please remember that you can always access a section using the floating table of contents at the upper-right corner of your screen.
- Many people asked how this manual can be "mini", since it is pretty big for an online single page article. Yes, if this page is exported to PDF, it is more than 40 pages. However, this manual is "mini" relative to the size of the official Emacs manual, which is more than 600 pages. That's why.
- If you find the page is loading too slow for you, you can always clone the git repo of this mini manual and read it offline: https://github.com/tuhdo/tuhdo.github.io
Why Emacs?
In Emacs, you can do many things aside from editing. Emacs is a programming platform, not just another editor in the sense that people think. For more details, read the Appendix.
Take a tour from the official Emacs homepage.
Here is my personal tour, with 3rd party plugins added. Don't worry if your Emacs does not look like the screenshots. You can have something like mine and even better, but for now you need to get a solid foundation. The screenshots are just for show. Even though, after going through this guide, you will be able to browse the Linux kernel source tree with ease.
Performance: Editing a 39MB C source file with no problem. But well, it's not your favorite editor's fault if it crashes from editing such a large source file.
- Programming:
Jump to any header file:
Autocompletion: Pay attention to completion candidates when
include <linux/printk.h>is present and when it's not.
Showing function arguments:

Quickly comment multiple lines:
GDB:
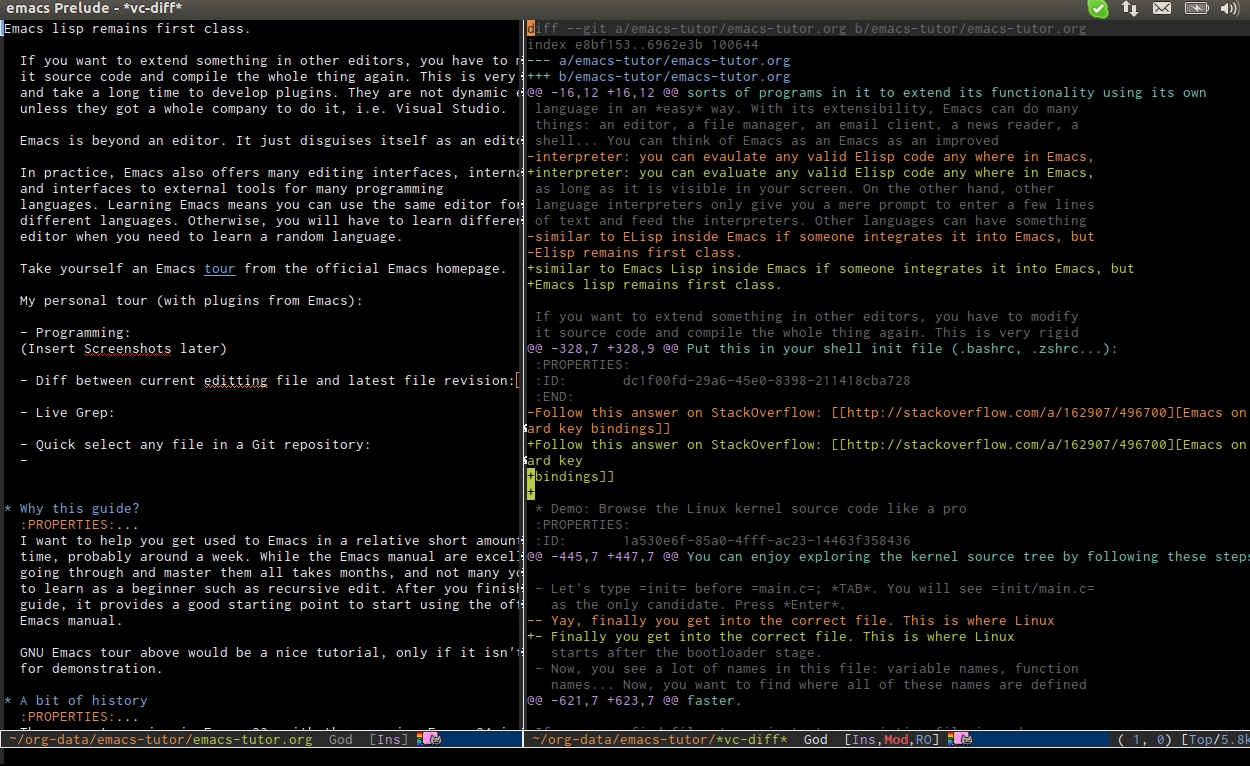
Diff between current editing file and latest file revision:
Magit: From unstage -> stage -> commit -> push
Live Grep:
Quickly select any file in a directory under a Version Control System, for example from the Linux kernel. Note that in the demos you may see me type in the commands. You can think of it like the start menu in Windows, but those commands can actually be executed quickly with a shortcut.
Quickly select any file/directory from a previous working session:
Emacs is a PDF Reader: I can search text in the PDF file with highlighting and a table of contents side by side. All can be controlled with keyboard.
 /
/
Finally, Emacs is featured in Tron Legacy.
Why this guide?
Let's look at part of the Emacs manual:
"All about handling files" is inside the Files entry, which includes
how to open files, save files, revert and auto-revert files, compare
files…, many things from basic to advanced. If you are a beginner
reading the Emacs manual, you have to actively search the manual to
learn how to do the basic common tasks you know from other editors.
It would take a long time before you can start using Emacs for basic operations (e.g. opening files) if you read the manual cover to cover. The "Fundamental Editing Commands" section is placed before the "Major Structures of Emacs" section that contains information on file handling. How can you learn the basic editing commands if you don't even know how to open a file? The problem with the manual is that it's not organized for a new Emacs user to progressively learn Emacs.
I want to help you use Emacs efficiently in a relatively short amount of time, probably around a week. That's why I wrote this guide especially for complete beginners. The Emacs manual is excellent, but it would be much easier with a solid ground understanding and after using Emacs for a while.
This guide provides a good starting point for the official Emacs manual. The GNU Emacs tour would be a nice tutorial, only if it isn't made for demonstration.
A bit of history
Quote from GNU Emacs homepage:
For those curious about Emacs history: Emacs was originally implemented in 1976 on the MIT AI Lab's Incompatible Timesharing System (ITS), as a collection of TECO macros. The name “Emacs” was originally chosen as an abbreviation of “Editor MACroS”. This version of Emacs, GNU Emacs, was originally written in 1984. For more information, see the 1981 paper by Richard Stallman, describing the design of the original Emacs and the lessons to be learned from it, and a transcript of his 2002 speech at the International Lisp Conference, My Lisp Experiences and the Development of GNU Emacs. Here is the cover of the original Emacs Manual for ITS; the cover of the original Emacs Manual for Twenex; and (the only cartoon RMS has ever drawn) the Self-Documenting Extensible Editor.
"I don't want a complicated editor, I want something simple like Notepad"
Well, that's your choice. But I suggest that writing code without any support is harmful.
A programmer should automate things as much as possible if the automation cost does not outweigh the cost of doing it manually. One really easy way to do this is by using a good editor that automates many menial and tedious tasks. For example, one of the things that annoy me is using the command cd to change into a deep directory path like this:
/path/to/a/very/long/long/long/long/long/long/..../directory/
In Emacs, if you have a directory under a version control system, you can immediately jump to any file quickly, even if it is buried 20 levels deep (as demonstrated at the beginning).
Another example is quickly commenting out multiple lines of code in a programming language that only supports single line comments. In many editors you would have to tediously comment them out line by line. But in Emacs you can simply highlight the lines and press a shortcut to comment them out.
Many people think that writing programs manually makes them much
cooler than "amateurs" that use a fancy Integrated Development
Environment. I also used to think like that because working in a
Linux environment requires understanding of the underlying processes,
such as building software using a Makefile in C/C++, automating with a
shell script, installing software by compiling… And this is already
considered "user friendly" in the Linux world, as opposed to "click
the nice little play button" in a typical IDE. However, I was
wrong. While working with such tools allows me to understand what's
going on, I do not need to type in code manually to understand it. If
you get what a for loop does, typing it character by character is only
tedious and interrupts your thinking.
Writing code manually won't make you smarter, because you did the
thinking before you started to type. Typing is just a mere reflection
of your thoughts into the editor. You need to finish typing as fast as
possible, because the quicker you finish, the quicker you can get back
to your thinking. Only thoughts matter, and there's no value in
manually typing the same things thousands of times. I must say, Cut,
Copy and Paste are really great ideas and great automation tools
because of their simplicity.
If your job may require you to use an esoteric in-house programming language and if you don't like it, having an editor to help you finish the tasks as soon as possible is a way to make yourself happier.
Typing too much can also lead to RSI. Manually typing too much code is harmful to your fingers. At least if you use a handsaw instead of a circular saw, you do some physical exercise in the process.
In Sum:
- Manually typing does not make you smarter. Not in any form.
- Manually typing does not make you a better programmer.
- Manually typing or other tedious tasks (navigating the file system, remembering changes you made to your files…) are a waste of time if automating is possible. Automate as much as you can.
- Good editors help you automate boring tasks.
- Typing too much potentially leads to RSI.
Instead of wasting your time and memory on tedious tasks, you could save it for more interesting things.
Installation
Linux:
Easy way to install if you are using Ubuntu: sudo apt-get install
emacs. If you use other Linux distributions, use the package manager
of your distribution and install Emacs. However, the package manager
only has the latest stable Emacs; if you want the latest Emacs, build
it from source according to the instructions below.
To use Emacs with GUI:
- Install GTK 3:
sudo apt-get install libgtk-3-dev libgtk-3-common libgtk-3-0 - Download Emacs; or if you prefer the latest Emacs, get it from source:
git clone http://repo.or.cz/r/emacs.git - If you download from the homepage, unpackage:
tar xvf emacs-*.tar.gz - Install GTK:
sudo apt-get install libgtk-3-dev libgtk-3-common
  libgtk-3-0
. You have to use gtk3 to be able to use true type fonts. cd emacs-<version>*./autogen.shAdd prefix and path to where you want to install. This is useful if you work on a remote server without root access:
./configure
  --with-x-toolkit=gtk3 [--prefix=/path/to/dir]
You should use GTKx 3, so you will be able to use true type fonts such as Inconsolata for a better Emacs experience.
makesudo make install
If ./configure tells you there are dependencies missing, you should
install them. Recommended dependencies: libtiff, libgiff, libjpeg,
libpng and libxml2 for viewing and browsing web inside Emacs:
sudo apt-get install libtiff5-dev libpng12-dev libjpeg-dev libgif-dev
libgnutls-dev libxml2-dev
Using in Terminal only:
- Download and unpackage as above.
./configure --without-x [--prefix=/path/to/dir]makesudo make install
If you don't like to compile Emacs yourself, install from the package manager of your Linux distribution.
After installation is done, add this line to your .bashrc or .zshrc:
alias em='emacs'
So you can start Emacs as fast as vim!
Windows:
You can either download it on GNU Emacs homepage or better, download the latest 64 bit version: http://semantic.supelec.fr/popineau/programming-emacs.html.
After that, unpackage it in C:\Program Files\ and create a shortcut
to C:\Program Files\Emacs\bin\emacsclientw.exe on desktop.
Mac OS X:
Download compiled Emacs for Mac OS X: http://emacsformacosx.com/.
You can also use this version that is more integrated with Mac OSX: https://github.com/railwaycat/emacs-mac-port
Swap Control and Capslock
Swapping Control and Capslock, in general, is not required to make the best out of Emacs, if you at least use a regular key PC keyboard or better. However, it is not nice at all on a laptop keyboard. If you use a laptop keyboard for writing code, I strongly recommended to swap Control and Capslock for a better Emacs experience.
Swapping Control and Caplock will not only benefit your Emacs usage, it is beneficial in general, as Control is a much more frequently used key than Capslock. Popular shells like Bash or Zsh use Control a lot for quick cursor movement.
Windows
Follow this guide: Swapping Capslock and Control keys
Linux
Put this in your shell init file (.bashrc, .zshrc…):
/usr/bin/setxkbmap -option "ctrl:swapcaps"
If you use Ubuntu, follow this guide: Swap caps lock and ctrl in ubuntu 13.10.
Mac OS X
Follow this answer on StackOverflow: Emacs on Mac OS X Leopard key bindings
Concepts
Command
In Emacs, every user interaction is a function execution. You press a
key to insert a character, Emacs runs self-insert-command. There are
two types of functions in Emacs:
- Normal functions: These are like functions in other programming languages, and are used for implementing features in Emacs. Users do not need to care about these functions, unless they want to implement something or modify an existing implementation.
- Commands: Commands are like functions, but interactive. It means, commands are features provided to users and users directly use them.
execute-extended-command is bound to M-x.
Emacs Key Notation
Taken from here: EmacsWiki
| Prefix | Meaning |
|---|---|
C- |
(press and hold) the Control key |
M- |
the Meta key (the Alt key, on most keyboards) |
S- |
the Shift key (e.g.‘S-TAB’ means Shift Tab) |
DEL |
the Backspace key (not the Delete key). Inside Emacs, DEL |
is written as <backspace>. |
|
RET |
the Return or Enter key |
SPC |
the Space bar key |
ESC |
the Escape key |
TAB |
the TAB key |
A notation such as C-M-x (or, equivalently, M-C-x) means press and
hold both Control and Meta (Alt) keys while hitting the x key. From
now on, I won't say something like "Press M-x" anymore. For example,
if I say "C-x C-f your files", you should replace C-x C-f with its
command like this in your head: "find-file your files". All commands
use verbs, I think, so don't worry. Try to recall the command from the
key binding; it will help you get used to Emacs quicker. One exception
though: I only say "press key" if key is a single character on the
keyboard.
If you see M-x command, it means you need to M-x and type
command.
A prefix key is a part of a full key binding. For example, a full key
binding is C-x r l to run the command bookmark-bmenu-list, then
C-x and C-x r are its prefixes. Note that key sequence such as
C-x and M-x are considered a single character. Knowing prefix key
is handy: if you forget key bindings of some commands that use the
same prefix key, and remember the prefix, you can press the prefix key
and C-h to get a list of commands with that prefix.
For example, C-x r is the prefix for register and bookmark commands in Emacs. However, you forget a specific key binding for a command in those features. C-x r C-h lists all key bindings that have prefix C-x r.
Finally, C-g executes the command keyboard-quit, which cancels anything
Emacs is executing. If you press any key sequence wrongly, C-g to
cancel that incorrectly pressed key sequence and start again.
As you gradually learn Emacs, you will see the key bindings are really systematically organized and mnemonic. Whenever you see key bindings ending with n and p, it usually means next and previous; o means open; h means help; C-h is standard prefix for help commands; key bindings such as o and C-o are frequently used in many built-in tools such as Dired, Ibuffer, Occur…
Emacs Keys are easy to remember
The key bindings have a few simple and easy to remember rules:
- C-x prefix is for default and global binding that come with Emacs.
- C-c prefix is for users to define.
- C-u is for altering behaviors of commands. That is, one command can behave differently depending on how many C-u you pressed first before executing a command. Mostly you just have to hit C-u once.
- C-<number> like C-1, C-2… is similar to C-u, but passing a number to a command. Usually, the number specifies how many times you want to repeat a command.
You will learn about C-u and C-<number> in Prefix Arguments
section.
Most commands can be organized in an easy to remember way. For
example, command like helm-do-grep (the command belongs to Helm, a
3rd party extension to Emacs) can have a key binding like C-c h
g. The h stands for Helm and g stands for grep. So, key
bindings are not difficult to remember.
Ask for help - from Emacs
Built-in help system
I will describe some most useful commands based on my experience. I will not list all, so you have to rely on Emacs to get your information:
C-h m runs describe-mode to see all the key bindings
and documentation of current major mode and minor modes of a buffer.
C-h w runs where-is to get which keystrokes invoke a given command.
C-h c runs describe-key-briefly to find out what command is
bound to a key. For example, after C-h c, run C-x C-f gives
you find-files.
C-h k runs describe-key to find out what command is bound to a
key, along with the documentation of the command. Use this if you want
to know how to use a command.
C-h e runs view-echo-area-messages, allow you to see the
logging of echo area messages.
C-h v runs describe-variable, and asks you for a variable; you can
TAB to complete a variable. This command is important, because aside
from describing a variable, it allows you to customize the behavior
of Emacs and 3rd party packages. But for now, you don't need it.
C-h C-h runs help-for-help. Use this command if you want to see a list of available help commands. Remember, if you partially remember a key binding, just press as much as you can remember and then press C-h, Emacs will list available commands for that prefix. Prefix C-h is no exception. C-h C-h simply returns all key bindings and commands of prefix C-h.
Info
M-x info or C-h i to see all the Info manual in Emacs. If you
want to learn more about Emacs, after reading my series of manuals,
the official Emacs manual in Info.
M-x info-emacs-manual or, C-h r, or <f1> r to see manual section
for Emacs.
Use Info often whenever you need to learn something in Emacs. Use it early to create a good habit of reading documentation, and this is beneficial not only for Emacs.
Man
You can view man pages with two commands:
M-x man: Get a UNIX manual page and put it in a buffer.M-x woman: Browse UN*X man page for TOPIC (Without using external Man program). It means, you can view man page without having themanprogram installed, while themancommand above invokes externalmanprogram.
Point
Point is your current cursor position. From now on, instead of saying "current cursor", I say "point".
Opening files
Let's learn one especially handy command. M-x find-, then press
TAB. You will see Emacs offers you a list of possible commands with
prefix find-. Select the command find-file, either by clicking on
it in the list; or keep typing a few more characters, and pressing
TAB until the command is completed. After find-file is in your
prompt, press RET. For quickly running find-file, you can use key
binding C-x C-f.
You can use wildcard expression to select more than one file. For example, if your directory contains these file:
file_a_1.cfile_a_2.cfile_a_3.cfile_b_1.cfile_b_1.hfile_b_2.c
Then in find-file prompt, you can open all file with extension .c
like this: file*.c. Or if you only want to select file with character
a in it: *a*.c. Or if you only want to select file with 1 and
extension .c. in it: *1.c. Basically, wildcard expression *
accepts anything.
During the exercise, if something happens, for example, you press the wrong keys and Emacs is behaving weird, just press C-g.
The command you have just executed is for browsing and opening files
in Emacs, similar to Open With in regular editors, except that
instead of navigating with the mouse, you navigate with keyboard,
which is much faster.
If you use find-file to navigate to an existing file in a deep
directory and press RET, it opens that file. Otherwise, if the file
does not exist and you press RET, you create a new file. Woot, two
features in a single command, so convenient. If you intend to open a
file at first, but then realize that you want to create a file
there, Open With doesn't allow you to do that. You have to navigate
all the way back with typical New File feature in regular editors.
Another interesting command in Emacs is find-file-at-point.
What this function does is that if you have a path to a directory or
file under point, M-x ffap opens that directory or file directly!
As you see in the demo, if for some reason, the directory at
point does not exist, ffap tries the parent directory until one
exist. In the example, only /home/ exists and got fed into the
prompt.
Ido mode
Emacs has an interesting feature called Ido, short for Interactively Do Things. In essence, Ido is a superior interface to interactively select things in Emacs compared to a plain prompt.
To activate Ido, M-x ido-mode. Let's open a file with C-x
C-f. Do you find this:
Or this:
Which is better?
Once enabled, Ido is used for most commands that require you to select something from a list.
A few things to note for when using Ido:
- If you want to use wildcard expression, you have to temporary revert
to ordinary
find-filevia C-f. - If you want to select the current directory, C-d. This invokes Dired file manager to open the directory and list the files in current directory. You will learn Dired in later section. For now, if you open the directory, close the current listing by C-x k and press RET.
- You select a directory in
find-fileprompt by pressing RET, not TAB like ordinaryfind-file.
Regardless, an alternative interface for completion and narrowing exists, arguably more powerful, but you have to install a 3rd party package. The package is called Helm. However, let's stick with Ido through the rest of this manual.
Buffer
Buffer is where you edit your file content. Buffer holds content
of a file temporarily. Anything you write into the buffer won't make
it into file until you explicitly save it with save-buffer
command. C-x C-s executes the command save-buffer, so you can C-x
C-s your files. You can also execute this from M-x*
To save a buffer as other file ("Save As" in other editors), C-x
C-w, which runs the commands write-file.
To kill a buffer, C-x k. If you want to kill the current buffer, RET immediately. Otherwise, type into the prompt the buffer name you want to kill.
In the previous section I said that point is in your file, well, actually point is not in a file but in a buffer. From now on, keep file and buffer two separate and distinct concepts. When I say file, I refer to physical file and when I say buffer, I refer to the temporary content of the file that is being displayed.
Exercise: Practice C-x b to get used to it.
| Key | Binding |
|---|---|
C-x C-s |
Command: save-buffer |
| Save the buffer at point | |
C-x C-w |
Command: write-file |
| Save the buffer to a different file | |
C-x b |
Command: switch-to-buffer |
| Switch to a different buffer | |
C-x k |
Command: kill-buffer |
| Kill a buffer. RET to kill the | |
| currently active one |
Major mode
Major modes provide specialized facilities for working on a particular file type, such as syntax highlighting for a programming language. Major modes are mutually exclusive; each buffer has one and only one major mode at any time.
Emacs is bundled with many major modes for editing source code in
different languages: C, C++, Java, Lisp, bash, asm… For example,
when opening a file with .c extension, Emacs automatically
recognizes it's a C file and selects the C major mode to highlight the
buffer properly.
Minor mode
Minor modes are optional features which you can turn on or off, not necessarily specific to a type of file or buffer. For example, Auto Fill mode is a minor mode in which SPC breaks lines between words as you type. Minor modes are independent of one another, and of the selected major mode.
Basic buffer managements
So, you learn how to open file and create buffer of that file. In other editors, you got something called "tabs". Every time you open a file, you get a file tab for selecting an "opening file" (which is called buffer in Emacs). It quickly becomes a nuisance once you have lots of file tabs. If you use multi-row support for file tabs, it eats up your editing space.
How do you switch between opening buffers? C-x b opens a prompt to enter a buffer name. You can TAB to complete the buffer name similar to how you complete file names in C-x C-f.
After you open a file, and if point is in that buffer, C-x C-f
prompts the current directory, so you can open another file within
this directory. For example, buffer A is from ~/dir1/ and buffer B
is in ~/dir2/, if point is in buffer A, C-x C-f starts in
~/dir1/; if point is in buffer B, C-x C-f starts in ~/dir2/.
In an Emacs session, you may have a lot of buffers, including
non-file buffers such as shell buffers, email buffers… How do you
manage buffers when it's getting large? C-x C-b executes
list-buffers, provide you a list of buffer in which you can
search. However, list-buffers is a simple command for buffer
management. Emacs also provides ibuffer, which is a superior
alternative. You will surely want to use ibuffer, but first let's
replace list-buffers with ibuffer (by placing next directive to your ~/.emacs file):
(global-set-key (kbd "C-x C-b") 'ibuffer)
Remember to save into *scratch* buffer and then M-x eval-buffer
for the setup to take effect.
Let's play with ibuffer.
Exercise:
- First, open many files with different extensions. The Emacs source
you used for installation is an great practice target. If you use a
built binary, download it and unpackage. Let's assume you download
and unpackage it at
~/Downloads/emacs-24.3. - C-x C-f, navigate to
emacs-24.3/lisp/and open all Lisp files:*.el. If you use Ido, remember to C-f before type into the prompt - C-x C-f, navigate to
emacs-24.3/src/and open all C files:*.c. - Open ibuffer by C-x C-b. You see a huge list of buffers.
Now the fun begins.
Suppose that you want to work with C code. / m and enter a major mode to select buffers that belong to this major mode. Prefix / in ibuffer groups filtering commands. TAB to see a list of major modes:
- Enter
c-mode. - Only C buffers remain. But you open buffers in two major modes:
c-modeandemacs-lisp-mode. You can create each group for one by pressing / g, and give the group a name. Only execute / g after executing any filtering commands. - Up to this point, the filtering is still applied. Press / / to remove previous filter and return the full buffer list.
- Let's create another group based filtering. / m and enter
emacs-lisp-mode. Create another group with / g and give it a name. Now, every time you open files that their buffers satisfy the filtering criteria, the buffers are put into appropriate groups. - To open a buffer, o or C-o. o opens a buffer and switch point
to it. C-o leaves point on the buffer list. Let's open a buffer
with o and C-o. To switch back to the other buffer, do C-x
o. C-x o executes
other-windowcommand, which cycles among the opening buffers (technically the buffers are in Emacs "windows", and you are cycling "windows", but we will get to that later). Either using C-o or o creates another buffer below, leaving you two horizontal buffers. You probably don't like the layout because you have a big screen. If you use o, C-x o to switch back to the list and C-x 1 to close other buffer. If you have multiple buffers opened, C-x 1 closes all others and leave the active buffer (the one with point, which is our buffer list) remains. To close an active buffer, C-x 0. C-x 3 to create a vertical buffer to the right. It creates an exact duplicate of the active buffer. Now, o on any C buffer again, and point is in that buffer:

- Edit something in the buffer. Switch back to
ibufferand press g, which runs the commandibuffer-updateto refresh the list. You will see an asterisk on the left of your just edited buffer. It indicates that buffer has been modified. You can also mark a buffer by pressing m on multiple entries to perform various operations:
- view: press A to view the marked buffers
- save: press S to save the marked buffers
- close: press D to close the marked buffers
- revert: press V to discard changes to the marked buffers
To unmark a buffer, press u on the marked entries.
- Another way to open the buffer: e (enter), f (find) or RET to bury and replace the list with selected buffer. Switch back to the list using C-x C-b again.
To sum up, I will list the key bindings your used in this section along with other useful key bindings:
- C-x C-b to open
ibuffer. - o or C-o to open a buffer at point.
- e, f or RET bury the buffer list and replace it with the buffer content.
- = to compare the current buffer content with its file.
Tip: When point is on an entry, C-x C-f starts at the current directory of buffer of that entry.
- Filtering commands:
| Key | Bindings |
|---|---|
/ m |
Add a filter by a major mode |
/ n |
Add a filter by buffer name. |
/ c |
Add a filter by buffer content. |
/ f |
Add a filter by filename |
/ > |
Add a filter by buffer size |
/ < |
Add a filter by buffer size |
/ / |
Remove all filters in effect |
- Filter group commands:
| Key | Bindings |
|---|---|
/ g |
Create a filter group from filters |
TAB |
Move to next filter group |
M-p |
Move to previous filter group |
/ \ |
Remove all active filter groups |
/ S |
Save the current groups with a name |
/ R |
Restore previously saved groups |
/ X |
Delete previously saved groups |
- Sorting commands:
| Key | Bindings |
|---|---|
, |
Rotate between sorting modes |
s i |
Reverse current sorting order |
s a |
Sort buffers by alphabet |
s f |
Sort buffers by filename |
s v |
Sort buffers by last viewing time |
s s |
Sort buffers by size |
s m |
Sort buffers by major modes |
To quit ibuffer, press q.
Bookmark: save locations across Emacs sessions
When you read books, you usually cannot read all at once and place a bookmark to go back to continue reading later. Emacs allows you to bookmark too.
| Key | Binding |
|---|---|
C-x r m |
Command: bookmark-set |
| Set bookmark at point. After executing the command, a prompt asks for a name. | |
| Enter the name and RET. | |
C-x r b |
Command: bookmark-jump |
| Jump to a saved bookmark, specified by user. TAB for getting bookmark list. | |
C-x r l |
Command: bookmark-bmenu-list |
| Open the list of all bookmarks. |
Remember that key bindings are easy. You just need to remember that C-x
r is the prefix for bookmark related commands. m stands for mark,
meaning you mark something in some place; b stands for bookmark,
meaning you can switch to any bookmark quickly, similar to C-x b
switches to buffers quickly. Finally, l means list for listing
bookmarks, analogous to ibuffer for listing buffers. If you want to
preserve the bookmarks across Emacs sessions, C-x r l to open the
bookmark list and press s to save the list to file.
If you understand how to manage buffers, managing bookmarks is the same, with different but similar key bindings. Finally, you cannot only bookmark buffers that are associated with files, you can bookmark non-file buffers too:
Diredbuffers- Info buffers
- Man pages
A few useful key bindings when in bookmark-bmenu-list:
| Key | Binding |
|---|---|
RET |
Open a bookmark. |
| After you opened the bookmark, you can go back to bookmark list | |
| by C-x r l. | |
1 |
Open a bookmark and close other buffers |
n |
Go to next entry |
p |
Go to previous entry |
s |
Save the current bookmark list to file. |
o |
Open bookmark in other window and move point to it. If you |
| want to view side by side, C-x 3 to create a vertical buffer | |
| and bookmark will be opened in the vertical buffer. | |
C-o |
Similar to o but point remains on the bookmark list. |
r |
Rename bookmark at point. |
m |
Mark bookmark at point for displaying. |
v |
Display all marked bookmarks. |
d |
Flag bookmark for deletion. |
x |
Delete flagged bookmarks. |
u |
Unmark marked or flagged bookmarks. |
Exercise:
- Open files and create a few bookmarks. C-x r b to switch between them.
- C-h i to open Info. Pick a node and enter as deep as you want. Then bookmark and kill current Info buffer.
- C-x r l to open the bookmark list and practice the key bindings in the table.
Basic motion commands
These key bindings are also used by popular shells such as bash or zsh. I highly recommended you to master these key bindings.
- Move forward one char: C-f (f stands for forward)
- Move backward one char: C-b (b stands for backward)
- Move upward one line: C-p (p stands for previous)
- Move downward one line: C-n (n stands for next)
The above operations can also be done with arrow keys. If you don't like the above key bindings, the arrow keys offer equivalent features.
- Move to beginning of line: C-a
- Move to end of line: C-e
- Move forward one word, M-f.
- Move backward one word, M-b.
These key bindings are in Emacs only:
- Scroll forward one screen: C-v, page down
- Scroll backward one screen: M-v, page up
- Move to the beginning of a sentence: M-a
- Move to the end of a sentence: M-e
- Recenter a screen: C-l
- Re-position point to the top, middle and bottom of the current screen: M-r
- Move to top of the buffer: M-<
- Move to end of the buffer: M->
- Move to the nth character: M-g c (c stands for
character) - Move to the nth line: M-g l for Emacs < 23.2, M-g g for emacs >=
23.2) (l/g stands for
line)
Recenter means making the current line point the center of your screen.
Exercise: execute the above commands using the key bindings at least 10 times or until you remember. You can perform these motion commands on any buffer.
Useful built-in key bindings for navigating pairs
C-M-f binds to
forward-sexp, move forward over a balanced expression. Demo:
C-M-b binds to
backward-sexp, move backward over a balanced expression. Demo:
C-M-k binds to
kill-sexp, kill balanced expression forward. Demo:
C-M-t binds to
transpose-sexps, transpose expressions. Demo:
C-M-<SPC> or C-M-@ binds to
mark-sexp, put mark after following expression. Demo:
Basic editing commands
In Emacs, kill means Cut in other editors. These key bindings also
work under the terminal.
- Kill a character at the point: C-d
- Kill entire line: C-S-DEL (remember, DEL is your <backspace> key)
- Kill forward to the end of a word from current point: M-d
- Kill backward to the beginning of a word from the current point: M-DEL
- Kill all spaces at point: M-\
- Kill all spaces except one at point: M-SPC
- Kill to the end of line: C-k
- Kill a sentence: M-k
When you kill something, the killed content is put into the Kill Ring.
If you write code, you can also quickly add comments or comment/uncomment code with M-;:
- If you do not highlight a text region, M-; adds a comment to the end of line.
- If you highlight a region (i.e. with a mouse), M-; comments out the region.
Dynamic Abbreviations
Dynamic Abbreviations are a completion feature in Emacs, but work for text and is context-independent. After you type a word once, if you type that word again, you can type it partially and M-/ to complete it. If you type a prefix that has many candidates, M-/ cycles the candidates. This is a really cool feature and you ought to try it.
Exercise:
- Type "thisIsaVeryVeryVeryVeryLongWord" into a buffer of your choice.
- Add newline or whitespace.
- Type "thisIs" and M-/. Great, Emacs automatically completes for you.
- Type "random" into your buffer and M-/. You will see Emacs tell your that no dynamic abbreviations found.
- Type "randomWord" and add a whitespace. Now, type "random" and M-/ again. Emacs can now happily complete "random" for you. Remember that to let Emacs remember your words, you have to type a complete word.
Kill ring
Kill ring is the list of previously killed contents. You can insert the most recently killed element by C-y.
If you supply a number, using C-<number> - <number> can be any number - before you C-y, to paste the nth entry in the kill ring. The most recent entry is 1st entry. C-1 C-y is the same as C-y; C-2 C-y is the 2nd most recent entry, make that entry the head of the list and so on…
Let's play with the kill ring for a while. Open a buffer and insert these 3 lines:
aaabbb
ccc
Then:
- Kill the three lines with C-k, from top to bottom.
- C-y or C-1 C-y, you will see
cccgot inserted. - C-2 C-y, you will see
bbbgot inserted; C-y again, you will seebbbgot inserted again.bbbnow becomes head of the list. - C-2 C-y, you will see
aaagot inserted; C-y again, you will seeaaagot inserted again.aaanow bedcomes head of the list. - Insert the 3 lines and kill all again.
- C-3 C-y, you will see
aaagot inserted; C-y again, you will seeaaagot inserted again.aaanow bedcomes head of the list - … and so on …
C-<number> is called prefix argument. Basically it's for altering the behavior of you command. You will learn about prefix argument in later section.
Alternatively to the above sequence, you can use M-y which runs
yank-pop. By default, when C-y, it inserts the most recent killed
text. If you want to retrieve earlier kill texts, after C-y, M-y
to cycle through the entries in kill-ring. You must first run C-y,
otherwise M-y has no effect.
You may wonder, what happens if the kill ring getting really large,
how can you remember where is which? That's right. It's a problem, and
that's when the 3rd party plugins shine. However, you can view the
kill ring with C-h v, then enter kill-ring. After this, you will
see the kill-ring content, but in its code form, which is not really
pretty and friendly.
Mark and region
Mark is a record of a position in a buffer. It's like when reading a book, you record various places in a book and these records are called bookmarks. It is similar, except it is buffer mark in Emacs (Emacs also has bookmark, but we will discuss later).
When you set mark between two points in a buffer, the text between two points are highlighted. We call the highlighted text a region. When the region is highlighted, we say the region is active; to deactivate a region, press C-g or move point around, just like in other text editors.
Exercise:
- Place a mark in buffer with C-SPC C-SPC. Let's call this mark A.
- Move to another place in the buffer, place another mark with C-SPC C-SPC. this is mark B.
- Move to another place and C-SPC C-SPC again. This is mark C.
- Now press C-u C-SPC. You can see point goes back to mark B.
- C-u C-SPC again. Point goes back to mark A.
- C-u C-SPC again. Point goes back to mark C.
- Let's create a region: C-SPC, then move point forward. What happened?
- The highlighted area is called a region. You can perform editing
commands on the region:
- C-w to kill the region
- M-w to copy the region
- C-y to yank (equivalent to paste) the region.
Let's copy or kill a region; you should select a big region. Now yank (paste) it elsewhere. After yanking, you notice point is not at the original location anymore. If you want to return to the where you yanked, C-u C-SPC or C-x C-x.
When you yank, you create a mark at point before the new content is inserted. After the content is inserted, point moves according to the size of the content. In general, most Emacs commands that create sudden displacement push marks, so you can go back to previous locations without having to tediously scroll the whole buffer.
C-x C-x executes the command
exchange-point-and-mark, which exchanges the point and the mark created when you yank with C-y. Try and see. When this command is executed, region bounded by the mark and point is activated. Using C-x C-x is really convenient. Instead of highlighting line by line forCopyorKill, you can do this:
Remember when you have to highlight a big region and for some reason, you lose the highlighting and have to do it all over again. C-x C-x saves you from that tedium.
C-u C-SPC simply returns you to previous mark location inserted when you C-y. This command won't activate region.
Practice until you get used to these two commands.
Mark ring
Emacs stores buffer marks in a list, that's why you are able to cycle through various marks in the exercise above. You can cycle through the list to jump to a mark, or with extension packages, you can have a list and interactively select it. Helm is an excellent example of such an extension. We will discuss more on extension packages later.
Global mark ring
Mark ring is local to each buffer. If you switch to another buffer, you have a new local mark ring.
Global mark ring is like mark ring, but they persist across buffers. Each time you set a mark, that mark is set in global mark ring in addition to the buffer's mark ring.
You cycle the global mark ring by C-x C-SPC.
Undo/redo
To undo: C-/ or C-x u
To redo, it's quite tricky to do because you have to understand how undo in emacs works. When you edit, emacs tracks changes in your current editing file. For example, you insert the following line in your file:
aaabbb
ccc
Then, Emacs tracks the history like this:
- insert: "aaa"
- insert: "bbb"
- insert: "ccc"
Now, execute undo twice. Your file becomes:
aaa
The history of the file changes:
- insert: "aaa"
- insert: "bbb"
- insert: "ccc"
- undo insert: "ccc"
- undo insert: "bbb"
How do insert back bbb and ccc. By undo your previous undos! ook closely at the above change history again. You see that Emacs keeps track your recent undo actions. execute some motion command, i.e C-f, then try C-/ twice and see what happens.
Great, you get your old content, bbb and ccc back. That is because you have just undone the latest "undo insert: …" entries in the file history.
When you was execute a series of undoing, without any other commands in between, Emacs keeps reverting to the older content. The series of undo insert: … got inserted into your file history when you break the undo series with other commands.
Again, two features in one command, but a bit confusing this time.
Exercise: Practice undoing/redoing until you get used to.
Search for text
Content search is an essential feature in every editor. Emacs has many built-in tools for this problem.
Incremental search
So, you want to look for something in the buffer? C-s invokes
isearch-forward, allows you to look forward from the current point
for something. After C-s, you are prompted to enter the content to
search for. Enter the content, and press C-s repeatedly to travel
through the matches forward.
Similarly, C-r invokes isearch-backward, allows you to look
backward from the current point. Press C-r repeatedly to travel
through the matches backward.
isearch can be invoked from any valid buffer. You can perform
isearch on ibuffer.
Exercise:
Open a reasonably large text file of your choice for practicing.
C-s, then type the search content and repeatedly press C-s. After repeated a few times, press C-r repeatedly. What happened?
You can invoke C-r within C-s and vice verse to go to the next and previous match.
C-g to cancels the current search session.
Move point to a word. C-s then C-w, selects content from point to end of a word. For example, if point is on character 'e' of "Hello world" C-w feeds "ello" into current C-s prompt.
C-w again feeds " world" into current prompt to become "ello world" and so on.
C-g, then C-s again. You can select the old input to search again with:
- M-p moves to the previous input.
- M-n moves to the next input.
If you want to search with regexp, C-u C-s.
Now you get the basics of Isearch, it has more useful commands that are bound to M-s prefix key:
| Key | Binding |
|---|---|
M-s . |
Command: isearch-forward-symbol-at-point |
| Feed the symbol at point to C-s | |
| perform search | |
M-s o |
Command: occur |
Run occur |
|
M-s h . |
Command: highlight-symbol-at-point |
| Highlight the symbol at point | |
M-s h l |
Command: highlight-lines-matching-regexp |
| Highlight lines that match input regexp | |
M-s h r |
Command: highlight-regexp |
| Highlight according to regexp | |
M-s h u |
Command: unhighlight-regexp |
| Turn off highlighting strings that match | |
| regexp. |
Occur
Command occur lists all line that match a string or a regexp and
displays the search result in a buffer named *Occur*. occur is
useful in situation where you have a large number of matches and need
a better tool to manage rather than going back and forth with
Isearch. For example, you have a match around line 1000, but you are
currently at line 500. In between the two lines are many other
matches. You cannot use Isearch to jump through them all. This is
where *Occur* is handy. *Occur* is also useful for query and
replace a string with another, and allow you to verify that you did
indeed replace the correct string.
To invoke occur, run M-s o; if you M-s o in Isearch prompt,
occur will get the text currently using. Quite convenient. You can
use M-g n and M-g p to go to next/previous matches, or use the
mouse to scroll. If you feel M-g p and M-g n to go back and forth
is annoying, you can repeat it using C-x z which runs repeat:
- M-g n to go to next match.
- C-x z to repeat previous command.
- From now on, keep pressing z to repeat previous command until your press a different character.
Demo, notice how the inactive cursor at the *Occur* buffer moves as point in
my main buffer moves:
You can operate directly on occur buffer. In *Occur* buffer, use
C-p and C-n to go to previous and next entries. Press o jumps to
the match at point and switch point to buffer that contains the
match; C-o to open the match at point but not switching buffer. If
you want to edit the matches, press e to enter occur-edit-mode;
after that, you can edit anywhere in the *Occur* buffer and see your
changes updated as you type on the other buffer. You can do any
editing commands when in occur-edit-mode, such as commands for query
replace in previous section to replace all matches.
Demo:
Here are key bindings in occur:
| Key | Binding |
|---|---|
C-n |
Go to next line |
C-p |
Go to previous line |
< |
Go to beginning of buffer |
> |
Go to end of buffer |
e |
Edit current *Occur* buffer |
C-c C-c |
When finish with editing, C-c C-c |
| to exit editing mode | |
g |
If your searching file is updated, |
press g refreshes the *Occur* |
|
| buffer to reflect the changes | |
o |
Jump to the match and switch point |
C-o |
Jump to the match but point remain |
on *Occur* |
If you want to have this table (and more key bindings), in *Occur*
buffer runs C-h m or press h. Finally, press q to quit *Occur*
buffer.
Query replace
To replace something, M-% to execute query-replace. M-% asks you two inputs:
- A string to be replaced.
- A string to replace.
Supply the inputs and RET.
Emacs will ask your confirmation to replace a matched string. If you want to replace all, press ! instead of answer yes or no (Note: it will replace ocurrences only beneath your current point).
If you want to query and replace with regexp, C-M-%. Tip: this command is a bit hard to press; to make it easy, use both of your hands:
- It can be that left hand presses % (or S-5) and right hand presses C-M-.
- It can be that right hand presses C- first, then left hand presses M-%.
Multi-occur
It is the same as occur except it asks user for multiple buffers.
multi-occurasks for buffers to search. You enter buffer by buffer until you give it empty input.multi-occur-in-matching-buffersrequires a regexp, and it searches for occurences in buffers that match the regexp.
Grep
M-x rgrep allows you to search for text with external grep command
and displays the results in a buffer. The good thing about running
grep in Emacs is that the raw output are processed. The end results
are colored and clickable, so that you can quickly visit the matched
location!
rgrep recursively greps for regexp in files in directory tree rooted
at dir. You will be prompted for these three inputs when rgrep runs.
With C-u prefix, you can edit the constructed shell command line
before it is executed. With two C-u prefixes, directly edit and run
grep-find-command (this is a variable), which is the underlying
command used for executing rgrep.

When you get a list of results displayed in a buffer named *grep*,
you can click on the results or use M-g p and M-g n to back and
forth between grep results, even if point is not active in *grep*
buffer.
The following key bindings are available:
| Key | Description |
|---|---|
| TAB | Go to next match, but do not display matched buffer |
| S-TAB | Go to previous match, but do not display matched buffer |
| { | Go to previous file, do not display matched buffer |
| } | Go to next file, do not display matched buffer |
| C-o | Display matched location, but do not switch point to matched buffer |
| (Only available in Emacs > 24.3) | |
| n | Display next matched buffer, but do not switch point |
| p | Display previous matched buffer, but do not switch point |
| M-g n | Display next matched buffer, switch point to matched position |
| M-g p | Display previous matched buffer, switch point to matched position |
| RET | Display matched location, switch point to matched bufer |
| SPC | Scroll down, equivalent to C-v |
| S-SPC | Scroll up, equivalent to M-v |
| g | Refresh the *grep* buffer with previously executed command |
| q | Quit *grep* buffer |
To get the list of key bindings, in *grep* buffer, type ? or h
or C-h m. Such a big list of key bindings, but worry not. These key
bindings are quite common in other Emacs utilities. You can reuse many
of these key bindings.
Modeline
The mode line is the empty area below the buffer. It has useful summary information about the buffer shown in the window.
The text displayed in the mode line has the following format:
cs:ch-fr | buf | pos line | (major minor)
For example, a modeline looks like this:

cs describes the character set of the text in the buffer. Do you see
the character U in the picture? It means your text is represented by
UTF-8 coding system.
If you type text in different human languages, and if the input method is
on, to the left of the U appears the symbol of that language,
i.e. \U, the backslash means TeX input method. C-\ prompts you
to select a language. After selecting, subsequent C-\ toggles the
selected input method on and off. You can set the input method again
with M-x set-input-method.
ch describes editing state of current buffer:
- This shows two dashes (‘–’) if the buffer displayed in the window has the same contents as the corresponding file on the disk; i.e., if the buffer is “unmodified”.
- If the buffer is modified, it shows two stars (‘**’). For a read-only buffer, it shows ‘%*’ if the buffer is modified, and ‘%%’ otherwise. You can see that in the picture, the buffer is modified.
fr gives the selected frame name. A frame is a Emacs window in your
OS. For example, these are two Emacs frames:
If you are using the GUI version of Emacs, it will always be a dash. However, if you use Emacs in terminal, you cannot have multiple frame window like the above screenshot. Instead, Emacs creates virtual frames with names like F1, F2…, Fn like this (notice my mouse pointer):
buf is buffer name. Buffer name is usually file name; but they can
have different names.
pos is display the current position of your viewing screen. If your
viewing screen starts from the first line, it displays as Top. If
you viewing screen contains the last line of your buffer, it displays
as Bottom. Otherwise, it displays % position, i.e. 20% means you
viewing screen is 20% away from the top.
line displays the current line number.
major displays the current major mode.
minor displays the current minor mode.
Minibuffer
Minibuffer is the small area at the bottom of your Emacs screen.
The Minibuffer is where Emacs commands read complicated arguments,
such as file names, buffer names, Emacs command names, or Lisp
expressions. When you execute find-file, it asks for your file from the
Minibuffer, which is one of find-file required argument. Remember I
said earlier that in Emacs, everything is a function. find-file is a
command, in other words, it's an interactive function. As a function,
it also takes arguments. Minibuffer is where users can feed arguments
to the interactive functions.
Minibuffer has an input history. If you enter anything into the minibuffer and RET, minibuffer remembers the input and you can access the input again with:
- M-p moves to the previous input in minibuffer history.
- M-n moves to the next input in minibuffer history.
- M-r searches for an input that matches the supplied regexp.
It works on any command that get input from the minibuffer, as you already used M-p and M-n to get old inputs in Isearch.
Echo area
Minibuffer can be used for output as well. The echo area is used for
displaying messages made with the message primitive, and for echoing
keystrokes.
Both Minibuffer and Echo Area, although serve different purposes,
share the same physical space. You should not be confused between the two.
Frames
An application window in an operating system is called a Frame in Emacs. So, you execute Emacs from the command line and open Emacs, that's a frame that contains your Emacs session. Emacs can have multiple frames to hold different parts of Emacs, such as a separate frame to hold the minibuffer.
Personally, I only use a single frame. However, frames can be useful if you want to organize buffers into different groups. For example, each frame can be a project: frame F1 holds buffers related to my C programming projects, frame F2 holds buffers related to customizing Emacs, frame F3 holds buffers related to emails and reading, newsgroups…
As stated earlier, multiple frames under the terminal have names F1, F2 …. Fn for each frame.
These are the key bindings for manipulating frames:
| Key | Binding |
|---|---|
C-x 5 C-f |
Command: find-file-other-frame |
| Open file in a different frame | |
C-x 5 f |
Command: find-file-other-frame |
| Same as C-x 5 C-f | |
C-x 5 C-o |
Command: display-buffer-other-frame |
| Open buffer in a different frame and move point there | |
C-x 5 . |
Command: find-tag-other-frame |
| Find tag at point in a different frame | |
C-x 5 0 |
Command: delete-frame |
| Delete the current frame point is in | |
C-x 5 1 |
Command: delete-other-frames |
| Delete other frames except the one at point | |
C-x 5 2 |
Command: make-frame-command |
| Create a frame | |
C-x 5 b |
Command: switch-to-buffer-other-frame |
| Same as C-x 5 C-o | |
C-x 5 d |
Command: dired-other-frame |
| Open a Dired buffer in another frame | |
C-x 5 m |
Command: compose-mail-other-frame |
| Open another frame for composing email | |
C-x 5 o |
Command: other-frame |
| Cycle through available frames | |
C-x 5 r |
Command: find-file-read-only-other-frame |
| Open file for read only in another frame |
Window
Unlike other editors, Emacs can split your frame area into multiple smaller
areas. Each such area is called a window. You can divide a frame
into as many windows as you want and each window can have anything in
it, i.e. your current editing buffer, file management buffer, help
buffer, a shell… Basically anything that Emacs can display. Let's try them out:
Exercise:
C-x 2 to split the current window into two horizontal windows. After
splitting, you will have the exact duplicate of your current editing
buffer. split-window-below is bound to C-x 2.
C-x 3 to split your current window into two vertical windows. After
splitting, you will have the exact duplicate of your current editing
buffer. split-window-right is bound to C-x 3.
Now, after you execute the two commands above, you will have three windows: two above and one below. Each window can hold a buffer. With the above two commands, you can create arbitrary window layout. In Emacs, a window layout is called a window configuration.
To navigate through the windows, use C-x o which runs the command
other-window. Try cycle around the windows a few times to get used
to it.
In Emacs, <next> is the PageDown key, <prior> is the PageUp
key. M-<next> runs scroll-other-window and scroll the other
window forward; M-<prior> runs scroll-other-window-down and scroll
the other window backward. Other window is the window that you visit
when C-x o.
C-x 0 closes the window at point.
C-x 1 closes all other windows except the current selected one. Create another window, then try C-x 1.
C-x 4 is a common prefix for opening things in other buffer. Things here can be files, shell, or a tree explorer. Here are standard C-x 4 bindings:
| Key | Binding |
|---|---|
C-x 4 C-f |
Command: find-file-other-window |
| Just like find-file discussed earlier, except open file | |
| in new window. If the current frame only has one window, | |
| a new window is created. | |
C-x 4 C-o |
Command: display-buffer |
| Select a buffer from buffer list and display it in another | |
| window but not move point to that window. | |
C-x 4 . |
Command: find-tag-other-window |
| Open the tag at point in another window (more on this later) | |
C-x 4 0 |
Command: kill-buffer-and-window |
| Just like C-x 0 but kill the buffer in that window as well. | |
C-x 4 a |
Command: add-change-log-entry-other-window |
| Open another buffer and allow you to record the change of | |
| the current editing file. These days, you use version control | |
| system to manage file changes,and Emacs does this better. | |
| Probably this feature exists when thing like Git does not exist. | |
C-x 4 b |
Command: switch-to-buffer-other-window |
| Open a selected buffer in another window and move point to | |
| that window. | |
C-x 4 c |
Command: clone-indirect-buffer-other-window |
| Clone the current buffer in another window and give it a | |
| different buffer name. | |
C-x 4 d |
Command: dired-other-window |
| Open a dired buffer in another window. Dired is a built-int | |
| file manager in Emacs. We will discuss later. | |
C-x 4 f |
Command: find-file-other-window |
| Same as C-x 4 C-f | |
C-x 4 m |
Command: compose-mail-other-window |
| Write mail in other window. You can write email and send it | |
| directly from Emacs. | |
C-x 4 r |
Command: find-file-read-only-other-window |
| Similar to find-file-other-window, but open for read-only. | |
M-<next> |
Command: scroll-other-window |
| Scroll other window forward. | |
M-<prior> |
Command: scroll-other-window-down |
| Scroll the other window backward. |
That's quite a long table, eh? If you forget, you can either:
- Visit my manual again :)
- Or much faster, access it directly from Emacs with it amazing help system. So, if you want to know all key bindings to prefix C-x 4, just C-x 4 and then C-h. If you enter a prefix key and enter C-h after it, it will list all of the key bindings and commands start with that prefix. This is really nice, compare to other editors that hide all this information deep within layers of menus.
Help system will be discussed in later section.
Prefix Arguments
In Emacs, behind anything is a function. Functions can accept arguments. You can also pass arguments into Emacs commands to modify its behaviours. However, you don't have to write code that calls a function with its arguments and then compile or evaluate it. You can pass arguments interactively.
Exercise:
Earlier, you learned motion commands such as C-f, C-b, C-p and C-n, remember? But, you can only move forward 1 character with C-f, move backward 1 character with C-b, 1 line upward with C-p and 1 line downward with C-n.
Now, try C-4 before any of those commands. See anything different? Great, instead of executing the commands once (i.e. Move forward 1 character …), you repeat the commands 4 times (i.e. Move forward 4 characters…).
Many commands allow multiple repetitions with prefix arguments.
You can even pass negative prefix arguments. Try executing the above commands with C–4, that's right, Control and - and 4 (minus 4). You see that you also execute the commands 4 times, but in reverse. That is, with C-f, instead of moving forward 4 characters, you move backward 4 times. You might wonder, what does it differ from C-4 C-b? You are right, it is the same. But, many commands do not have their reversed versions, so negative argument is always useful in those circumstances.
Now, try executing C-u 4 C-f. You will see it does the same thing as C-4 C-f. Again, why do we need C-u? It is because in a terminal, you can not use Control with digit keys. C-u tells Emacs that you are about to enter a numeric argument, and it will be ready to accept the input. It's just a different way to do thing.
If you do not supply any prefix argument, such as you directly execute C-u C-f, then the numeric argument is default to 4. Try C-u C-f, and see that it moves 4 characters forward. Try it a few times to get used to.
If you execute C-u consecutively, the numeric argument is a power of 4. If you press C-u, the resulting argument is 41; C-u C-u, the result is 42, which is 16; C-u C-u C-u, the result is 43, or 64. I know large powers are hard to calculate, but there is a plugin that displays the calculation and display these numbers. That plugin is Helm, but I will discuss that later in part 2.
Why number 4 for C-u? I don't know.
Basic file management with Dired
Emacs has a built-in one called Dired, short for
(Dir)ectory (Ed)itor.
This section is a shortened version of Dired in GNU Emacs Manual. After you read and practice these commands, read the Dired Manual if possible.
Enter Dired
| Key | Binding |
|---|---|
C-x d |
Select directory of your choice and start Dired in that directory |
C-x 4 d |
Select directory of your choice and start Dired in another windows. |
C-x C-f |
Select a directory to enter Dired |
Exercise: Execute the above commands at least once to get used to it. What command do you like the most?
Navigation
| Key | Binding |
|---|---|
n |
Move to next entry below point. |
p |
Move to previous entry above point. |
C-s |
Find text using Isearch; useful for searching entries in Dired |
You can supply prefix arguments for these commands. i.e. 4 n moves
to the entry which is 4 lines below.
Exercise: Execute the above commands, with and without prefix argument.
Create files
To create a new file in Dired, you use the same C-x C-f and C-x 4 C-f variant.
| Key | Binding |
|---|---|
+ |
Prompts for a directory name and create one after RET. |
C-x C-f |
Create a new file. This is your regular find-file. |
Exercise:
- Create a new directory called
dired_practiceor a name of your choice. - Create a new file of your choice.
Visit files
| Key | Binding |
|---|---|
f or e or RET |
Open current file at point. |
o |
Open file at point in another window. |
C-o |
Open file at point in another window, but do not select that window. |
v |
Open file for read only. |
^ |
Open parent directory and create another Dired buffer of parent directory |
Exercise:
- Assume you are in your newly created directory in previous section.
- Go up to the parent directory using
^. - Open another directory. You will enter that directory, and a new buffer is created for listing the content of that directory.
- Go up to the parent directory using
^. - Repeat opening and go up parent directory a few times.
C-x b and TAB. You will see a bunch of opened directory through your filesystem navigation. Whenever you open a file or directory, using Dired or other methods, you have a buffer of that directory.
At this point, you may feel annoyed that Dired opens too many buffers and it will go out of control at some point. Worry not! That's why you have
ibuffer.M-x ibufferorC-x C-bif you've already replacedlist-buffers./ mand selectdired-mode./ gand name the groupDiredand you have a separate group for managing directories. No more cluttered view with other buffers. You can stop worrying now.
If you want to enter directory you visited, open
ibufferand look for it. This is efficient for a complex directory tree. For example, if you have to constantly work with these many directories:directory_root/dir1/dir2/dir3/dir4/directory_root/dir2/dir2/dir3/dir4/directory_root/dir5/dir6/dir7/dir8/- ….
The layouts of top two directories are common when you have to create patches. Working in a normal file manager like File Explorer in Windows, you only have one directory view. Going back and forth is tedious and inefficient, and you have to remember different directory paths. To make it easy, you have to open multiple File Explorer manually. Under the terminal, you have to create symbolic links for those directories to save you time. However, you still have to manage the links manually, like delete when they are not used, or update when directory the links pointing to are moved.
Emacs does it all for you, automatically. With this feature, you can freely navigate the filesytem without having to remember the working directory to get back later, because you can easily go back to it quick and easy.
File Marking
You flag files for deletion. You mark files for everything else
(i.e. copy, move, link files…). There are many marking commands for
specialized file types. Except for m, % m and % g, all marking
commands have prefix *. I will list the most useful one; you can
look up the other marking commands in Dired Manual.
| Key | Binding |
|---|---|
m |
mark the entry at point. You can mark more than one, either |
| downward or upward with prefix argument. | |
% m |
mark all files whose names match supplied regexp. |
% g |
match all files whose contents match the supplied |
| regexp. This is the same as using Grep. |
Exercise: Practice the listed marking commands. Keep a few marked files/directories for the next section.
Operating on files
These commands use uppercase character. If you see an uppercase character for a command, it means S-<character>.
| Key | Binding |
|---|---|
C |
Prompt for a location to copy the file at point (if no file |
| is marked) or marked files. | |
R |
Prompt for a location to rename or move file at point (if no |
file is marked) or marked files. This is the same as mv |
|
| command in shell. | |
H |
Prompt for a location to create a hard link. |
S |
Prompt for a location to create a symbolic link. |
M |
Change permission bits of file at point or marked files. |
Exercise:
- Create a new directory at the current directory.
- Assume that your still keep the marked file in the above section;
Cand prompt for the directory you have created. RET to confirm copying. - If you want to move marked files/directories, use
R. If you want to rename, mark only a single file/directory and put a new name in the rename prompt. - Enter the directory you have just copied the files.
- Move your cursor on a file and
Hto create a hard link. A prompt ask for destination and the link name. Create a link at the current location with different name from the original file. - Move your cursor on a file and
Sto create a symolic link. A prompt ask for destination and the link name. Create a link at the current location with different name from the original file. - Move your cursor on either the hardlink or symlink you created and
Mand change the bit permission; set it to something like000. - After that, press
gto refresh the Dired buffer. Look at the original files the links point to, you will see the permission attributes are cleared and you won't be able to access those files.
Deleting files
| Key | Binding |
|---|---|
d |
flags file for deletion. |
u |
remove flagged files. |
# |
flag all auto-save files (files whose names start and end with ‘#’). |
~ |
flag all backup files |
% &* |
flag for deletion all files that match dired-garbage-files-regexp. |
% d |
flag files which matches a regexp. |
x |
confirm and delete flagged files. |
Execute shell commands in Dired
Just like in a shell, you can execute commands in the current directory in Dired too.
| Key | Binding |
|---|---|
! |
execute a command on selected file or files. |
& |
execute a command on selected file or files asynchronously. |
Compare files
| Key | Binding |
|---|---|
| = | compares the file at point with another file supplied by user from |
| a file prompt in the minibuffer. |
Subdirectories
This is an exciting feature of Dired. In other file explorers, you get a tree to browse your directory. If you have a deep directory structure, it will quickly become a nuisance.
Dired allows user to insert the content of a directory just below the current directory. You can search for file names with C-s easily in both directories. You can insert as many subdirectories as you want.
Move point on a directory in Dired and press i. You will see another directory insert below:
This is really efficient when you work on several related directories in a project frequently.
Exercise:
- Open a directory with subdirectories inside it.
- Insert subdirectories with i.
- Remember Bookmark? You can save Dired buffers with Bookmark for later access. C-x r m and save the current Dired buffer with subdirectories.
- Kill the current Dired buffer with subdirectories.
- Open the Dired buffer via the bookmark list C-x r l. You will see that not only your Dired buffer is fully restored, but your subdirectories too.
Registers
When I first heard about registers in Emacs, it scared me. I thought "Wow, what is this "register" thing? Am I going to work directly with CPU registers?" As it turned out, despite the name "Register", it's not something that complicated to understand. Although, an Emacs register is similar to a CPU register in the sense that it allows quick access to temporal data.
Each register has a name that consists of a single character, which we will denote by r; r can be a letter (such as ‘a’) or a number (such as ‘1’); case matters, so register ‘a’ is not the same as register ‘A’.
In Emacs, registers are for quick access to things. Things can be a position, a piece of text, a rectangle, a number, a file name, or a window configuration (yes, you can save how Emacs organizes its screens and restore it later!).
Saving different types of objects has different key bindings, but to jump to a register, you use a single command C-x r j REG; REG is a register of your choice.
The prefix key for register commands is C-x r. If you forget the key bindings, C-x r C-h to get the list of key bindings.
Save window configuration
One of the best uses of registers. It simply saves your current window configuration and restores the layout later.
For example, you are viewing four source code buffers, but want to open two Dired buffers side by side to for managing files, so you close two windows and switch the other two windows to Dired buffers. But this makes you lose the perfect layout you had, and later it would be tedious to restore the windows one by one to finally recreate the original layout you were working with. Then, later, you have to do something else, you have to break your window configuration, you have to manually restore your window configuration again, and have to remember exactly which buffers you were working with.
To free yourself from this burden, register is the answer. You can save a window configuration with four windows displaying four buffers, and another one having two Dired buffers for your project. You can more easily switch between them.
| Key | Binding |
|---|---|
| C-x r w REG | Command: window-configuration-to-register |
| Save the window configuration of current frame into register REG | |
| C-x r f REG | Command: frame-configuration-to-register |
| Save the state of all frames, including all their windows, in register REG | |
| C-x r j REG | Command: jump-to-register |
| Jump to a register REG. |
REG can be a letter (such as ‘a’) or a number (such as ‘1’); case matters, so register ‘a’ is not the same as register ‘A’.
Demo: In this demo, I saved two windows configurations in two registers a and b, using C-x r w. Register a stores the Dired buffer that contains two project directories. Then, I open two files in the two directories, create another smaller window and open another file. Then, suddenly I want to go back to my project roots. It's then when I execute C-x r j, get a prompt, enter a and Emacs switches back the Dired buffer. Then, I switch back to the files I was editing with C-x r j, get a prompt, enter b.
The demo starts when you see at the bottom a prompt with "Eval: START".

Exercise:
- Save a few window configurations into registers. I suggest that each window configuration should represent a workspace of a project. But it could be anything you like, up to your imagination.
- Go back and forth between window configurations by jumping into appropriate registers.
Save frame configuration
| Key | Binding |
|---|---|
| C-x r f REG | Save current frame configuration into register REG |
If you create multiple frames with frame commands (prefix C-x 5), then you may want to save your frames with different window configurations in it, for later use. For example, I can have a frame for reading documents and my main frame for writing and browsing code. When I finish working, I close the extra frame, leaving my main frame active. But later, when I need to have that exact frame setup, I can always restore with saved frameset in a register.
Exercise:
- Create a few frames with C-x 5 2, C-x 5 d, C-x 5 f…
- Save the frameset into a register.
- Close all the frames except the main one.
- Restore the frames by jumping to the register that stores the frameset.
Save text
You can also save a region in registers.
| Key | Binding |
|---|---|
| C-x r s REG | Command: copy-to-register |
| Copy region into register REG | |
| C-x r i REG | Command: insert-register |
| Insert text from register REG |
REG can be a letter (such as ‘a’) or a number (such as ‘1’); case matters, so register ‘a’ is not the same as register ‘A’.
You may wonder, what's the point of storing text into register? Haven't you got a kill ring? Here are the reasons:
- As you already know, inserting past content from the kill ring makes the chosen content the head entry. This is inconvenient, and this is when registers are handy for storing many pieces of text without affecting the kill ring. For example, you read a manual (man page or info page), and you want to remember many keywords and paste it somewhere later. Registers can help you with this use case.
You can also use registers to save many code templates. For example, you can save a for loop template into register f, if template into register i, function definition into register F… This is really handy when you are learning a new language and keep forgetting syntax all the time.
For example, this C++11 code snippet would be hard to remember if you are new:
  auto it = find_if (vertices.begin(), vertices.end(), [&v_idx] (const Vertex& o) -> bool {
    return o.id == v_idx;
});
I save it to a register, insert and modify it to fit my current need until I remember it. This is much faster than to go back to the previous source location to look it up again, and would be time consuming if your source code is large.
Exercise:
- Copy a few text snippets into registers.
- Re-insert it in a buffer.
Save rectangles
| Key | Binding |
|---|---|
| C-x r r REG | Command: copy-rectangle-to-register |
| Copy the region-rectangle into register REG | |
| With C-u prefix, delete it as well |
Insert the rectangle in register REG by C-x r i REG.
Exercise:
- Save a few rectangles in registers a few times to get used to it.
- Insert the rectangles in the registers into some buffer.
Save position
| Key | Binding |
|---|---|
| C-x r <SPC> REG | Command: point-to-register |
| Record the position of point and the current buffer in register REG | |
| C-x r j REG | Command: jump-to-register |
| Jump to the position and buffer saved in register REG. If the buffer | |
| is killed, revisit the file and open the buffer, then jump. |
Saving positions are useful when it is used with Macro, which is discussed later.
Important Note:
When you jump to a position into a register, Emacs always jumps to that position, even if the content of the buffer is changed. That is, if you already saved a position into a register and when the buffer that holds that position changes, the saved position changes as well. For example, you save position 100 (it means the position of 100th character) and you add or remove a number of characters before the 100th character, then the position in the saving register also add or subtract according to that number.
Exercise:
- Save a buffer position into register a with C-x r SPC a.
- Move point else where.
- Jump back to previous position with C-x r j a.
- Move point backward a few characters.
- Add some characters.
- Jump back to position in register a with C-x r j a.
- You see that point does not jump to original position, but away from the original position a number of characters that is equal to the number of your added characters.
- Go to the beginning of line and RET to add a newline.
- Jump back to position in register a with C-x r j a.
- You see that point jumps to position in register a, but one line below.
Save numbers
| Key | Binding |
|---|---|
| C-u number C-x r n REG | Command: number-to-register |
| Store number into register REG | |
| C-u number C-x r + REG | Command: increment-register |
| If REG contains a number, increment the | |
| number in that register by number. |
You can insert the number from a register REG with C-x r i
REG. These numbers are handy when used with Keyboard Macro.
Exercise:
- Save a few numbers into registers.
- Add a number of your choice into numbers saved in the registers.
- Insert back the number in registers into a buffer, and see the result.
Macro
Macro records your actions in Emacs and play back later.
| Key | Binding |
|---|---|
f3 or C-x ( |
Start recording macro |
f4 or C-x ) |
Stop recording macro |
C-x e or f4 |
Playback macro |
Personally, I use f3 and f4 for recording/playback, so I don't
have to press many keys. To repeat a macro many times, use prefix
argument. For example, C-u 10 <f4> executes a macro 10 times. If you
want to cancel recording, C-g.
Exercise 1:
Copy these lines into a buffer of your choice:
aaaaabbbbbbbccccccdddddd
aaaaabbbbbbbccccccdddddd
aaaaabbbbbbbccccccdddddd
aaaaabbbbbbbccccccdddddd
aaaaabbbbbbbccccccdddddd
aaaaabbbbbbbccccccdddddd
aaaaabbbbbbbccccccdddddd
aaaaabbbbbbbccccccdddddd
aaaaabbbbbbbccccccdddddd
aaaaabbbbbbbccccccdddddd
aaaaabbbbbbbccccccdddddd
aaaaabbbbbbbccccccdddddd
aaaaabbbbbbbccccccdddddd
aaaaabbbbbbbccccccdddddd
Now, you want to separate each line into different groups, each group contains their own character, like this:
aaaaa bbbbbbb cccccc ddddddIn many editors, you have have to do it manually. In Emacs, you don't have to repeat yourself, using macro. Follow these steps:
- Place point at the beginning of the first line.
- Press <f3>.
- Use C-s to search-and-jump to the beginning of each character group (or C-f if you want something simple) and add whitespace.
- Return to the beginning of next line. Press <f4> to finish recording.
- Continuously press <f4> and see Emacs playbacks the whole action sequence you've just recorded.
- If you want to repeat more than 1 time, using prefix argument. If
you want to repeat until the end of file, use prefix argument 0:
C-u 0 <f4>. Alternatively, highlight the region of remaining
lines, and C-x C-k r: run the last keyboard macro on each line
that begins in the region (
apply-macro-to-region-lines).

After a macro is defined, it is saved in the keyboard macro ring. There is only one keyboard macro ring, shared by all buffers. All commands which operate on the keyboard macro ring use the same C-x C-k prefix. Just remember the prefix C-x C-k = macro commands, and you won't find macro key bindings difficult to remember.
Exercise 2: Transform data from one format to another
For example, I have this table with some data:
machine1=(aa:bb:cc:dd:ee:a1 aa:bb:cc:dd:ee:a2 aa:bb:cc:dd:ee:a3)
machine2=(aa:bb:cc:dd:ee:b1 aa:bb:cc:dd:ee:b2 aa:bb:cc:dd:ee:b3)
machine3=(aa:bb:cc:dd:ee:c1 aa:bb:cc:dd:ee:c2 aa:bb:cc:dd:ee:c3)
machine4=(aa:bb:cc:dd:ee:d1 aa:bb:cc:dd:ee:d2 aa:bb:cc:dd:ee:d3)
machine5=(aa:bb:cc:dd:ee:e1 aa:bb:cc:dd:ee:e2 aa:bb:cc:dd:ee:e3)
machine6=(aa:bb:cc:dd:ee:f1 aa:bb:cc:dd:ee:f2 aa:bb:cc:dd:ee:f3)
Basically, each row contains the MAC addresses of Ethernet interfaces of a machine in the server cluster at my workplace. The data are stored in a plain text file. But then, we want to integrate these data inside our YAML file to do something else. I have to basically transform the data in the above format to the one below:
machine 1:
    mac1: aa:bb:cc:dd:ee:a1
    mac2: aa:bb:cc:dd:ee:a2
    mac3: aa:bb:cc:dd:ee:a3
In the real data file, it contains around 50 entries. Manually transforming text would be tiresome. Thanks to Emacs, I solved this problem with a keyboard macro.
- Pre-recording setup:
Before recording a macro to automate this transformation, we need to
properly set things up:
- Create two buffers side by side with C-x b. Name the left buffer
buf1and right bufferbuf2. Yank the original data into
buf1. Move point back to beginning of buffer.That's set and done. Here is how it should look like:
- Create two buffers side by side with C-x b. Name the left buffer
Record:
Point should be at
buf1, at the first line of the data.- Press <f3> to start.
C-SPC then M-f. This marks the word
machine1. Store this word into registerawith C-x r s a.
Move point to the beginning of the first MAC address. C-SPC then C-s and search to the first delimiter, which is an empty space " " in this case. C-b to move back to the end of the first MAC address. Store this region into register b with C-x r s b.
After that, move point to the beginning of the 2nd MAC address, C-s to space and C-b to go back one character. Save the region into register c with C-x r s c.

Repeat for the last MAC address and save it in register d.

- Switch to the second buffer with C-x o:
Insert the register from
atodaccording to the template:
- After inserting, move point to the next empty line.
- Switch back to
buf1with C-x o. - Move to the beginning of next line.
- Press <f4> to stop.
Play:
Now you can play back your new keyboard macro to transform the remaining entries.
Here is the whole process:
Keyboard macro ring
| Key | Binding |
|---|---|
| C-x C-k C-k | Command: kmacro-end-or-call-macro-repeat |
| Execute the keyboard macro at the head of the ring | |
| C-x C-k C-n | Command: kmacro-cycle-ring-next |
| Rotate the keyboard macro ring to the next macro | |
| (defined earlier). | |
| C-x C-k C-p | Command: kmacro-cycle-ring-previous |
| Rotate the keyboard macro ring to the previous macro | |
| (defined later) |
Exercise:
Define a few more keyboard macros and practice the above commands.
The Keyboard Macro Counter
Each macro has a counter which is initialized to 0. Everytime a counter is inserted into the buffer, its value is incremented by 1.
| Key | Binding |
|---|---|
| <f3> | Command: kmacro-start-macro-or-insert-counter |
| Insert the counter into the buffer and increase the counter | |
| by 1. This is only applicable when a macro is recording | |
| C-x C-k C-i | Command: kmacro-insert-counter |
| Insert the counter of current macro into the buffer | |
| C-x C-k C-c | Command: kmacro-set-counter |
| Change the counter value of current macro | |
| C-x C-k C-a | Command: kmacro-add-counter |
| Add a number to the current keyboard macro counter. C-u | |
| before running this command resets the counter back to | |
| previous value | |
| C-x C-k C-f | Command: kmacro-set-format |
| Specify the format for inserting the keyboard macro counter |
Valid format specifications for C-x C-k C-f:
| Specification | Description |
|---|---|
%o |
Insert base-eight representation of an integer. |
%d |
Insert base-ten representation of an integer. |
%x |
Insert base-sixteen representation of an integer. |
%X |
‘%x’ uses lower case and ‘%X’ uses upper case. |
%c |
Insert the character which is the numerical value given. |
%e |
Insert exponential notation for a floating point number. |
%f |
Insert decimal-point notation for a floating point number. |
%g |
Insert notation for a floating point number, using either exponential notation or |
| decimal-point notation, whichever is shorter. | |
%% |
Insert a single ‘%’. This format specification is unusual in in that it does not use |
| a value. For example, (format "%% %d" 30) returns "% 30". |
The format must contain at least one of the valid specification above or combination with other text. For example, these are valid format:
0x%xProject %d:Plain text
Exercise 1: Creating incremental header prefix
Format specification is useful for making formatted output with macro, combine with the counter, it is useful for appending numbered prefix at beginning of line. For example: We usually write code comment that describes sequential steps in a high level point of view like this:
- Step 1 of 5: ...
- Step 2 of 5: ...
- Step 3 of 5: ...
- Step 4 of 5: ...
- Step 5 of 5: ...
Keyboard macro can help us generate such text pattern effortlessly.
- C-x C-k C-f and enter this format:
- Step %d of 5: - <f3> to start recording.
- <f3> again to insert the first counter value, which is
- Step 0 of 5: - RET to move to the next line.
- <f4> to stop recording.
- Now press <f4> as many time as you want and see header prefix got inserted with incremental values.
- You can insert the text any value by simply set the counter with C-x C-k C-c.
Remember to use this the next time you write comments for your code that need an ordered list to describe the steps of your algorithm.
Exercise 2: Generate a list of numbers
With macro counter, you can easily generate a list of number in supported base:
- C-x C-k C-f and enter a format like this:
%d(or a base number of your choice). - Initialize the macro counter to a number of your choice.
- <f3> to start recording.
- If you want the numbers to be 5 units (or any number greater than 1) apart from each other, C-x C-k a to add a number to the counter. If you only want to increase by 1, skip this step because the default is 1.
- <f3> to insert the first number.
- SPC to create a separator.
- <f4> to stop recording.
- Now <f4> repeatedly to see numbers getting generated.
Macros with Variations
Macro is excellent for repetitive editing tasks. However, sometimes you have a repetitive task that can make use of macro, but not always repetitive: a part of the task varies every time you repeat it. For example, you have a text template, with some blank fields for fitting in appropriate information. Keyboard macro supports this use case.
When in the process of defining a keyboard macro, C-x q marks the current point in the process, and when the keyboard macro is executed and reaches this point, it will ask to confirm:
| Response | Action |
|---|---|
| Y | Finish this iteration normally and continue with the next. |
| N: | Skip the rest of this iteration, and start the next. |
| RET | Stop the macro entirely right now. |
| C-l | Redisplay the screen, then ask again. |
| C-r | Start editing at point. C-M-c to go back to macro execution |
Exercise: Inserting interactive template
Suppose you practice Agile and have to write a lot of user stories like this:
As a <type of user>, I want <some goal> so that <some reason>.
Obviously, you do not want to repeat the template texts, such as "As
a", "I want" or "so that". The only contents that varies are <type of
user>, <some goal> and <some reason>. You can create a macro that
stops and waits for your action at these checkpoints. C-r to start
editing.
- First, copy this template:
As a , I want , so that
- <f3> to start recording.
- C-y to yank the template.
- Move point to positions that need modifications, then C-x q.
- <f4> to stop recording.
- Now <f4> and you will see the macro stops at the positions where you pressed C-x q before and ask for your action.
- C-r to edit. After done editing, C-M-c to go back.
- You are asked the same question as before. If you still miss something, C-r to edit again. Otherwise, press y to proceed to the next point.
- Continue until the end of macro.
Naming and Saving Macro
| Key | Binding |
|---|---|
| C-x C-k n | Command: kmacro-name-last-macr |
| Give a command name (for the duration of the Emacs session) | |
| to themost recently defined keyboard macro. | |
| C-x C-k b | Command: kmacro-bind-to-key |
| Bind the most recently defined keyboard macro to a key sequence | |
| (for the duration of the session) |
When macro has a name, it becomes a command and you can find it in
M-x and can be saved with M-x insert-kbd-macro. After executing
the command, you are prompted for a macro name (you can use TAB to
complete the name); select a macro and the Lisp code of the chosen
macro is inserted into the current buffer, then save the buffer. You
should have a dedicated file for your own keyboard macros. You can
reload this file for later Emacs session with the command
load-file.
You can also bind a macro to any key sequence. However, to avoid clashing with existing key bindings, you should use the prefix C-x C-k. For example, you can bind a macro to C-x C-k 1, another to C-x C-k 2…
Exercise 1: Save your macro in a file
- Record some keyboard macros.
- Give the macros names with C-x C-k n.
- Bind the macros to C-x C-k 1, C-x C-k 2… with C-x C-k b.
- Create the file
~/.emacs.d/init.el. If you do not have the directory and the file, create it withfind-file. - Create the file
~/.emacs.d/macroswithfind-file. You should be inside the buffer of this file after creating it. - Save the macros with
M-x insert-kbd-macro. To save you trouble of reloading the macro file manually, put this Emacs Lisp code inside
~/.emacs.d/init.el:(load-file "~/.emacs.d/macros")
The above code essentially loads a file at a path. Only files that are Emacs Lisp source code are valid.
- Now, every time Emacs starts, it will automatically load the
macrosfile. By default, Emacs loads any Emacs Lisp code at~/.emacs.d/init.elwhen it starts. Since you put the above code ininit.el, yourmacrosfile is also loaded.
Exercise 2: Composite macros
Back to exercise 2 at the beginning of Macro section, do you remember you had to create a big macro to convert text structures? Certainly it can be done more comfortably by splitting it into smaller macros, saving these macros into Emacs commands and putting them all together in a macro.
- Pre-recording setup:
Before recording a macro to automate this transformation, we need to
properly set things up:
- Create two buffers side by side with C-x b. Name the left buffer
buf1and right bufferbuf2. - Yank the original data into
buf1, then move point back to beginning of buffer:
- Create two buffers side by side with C-x b. Name the left buffer
machine1=(aa:bb:cc:dd:ee:a1 aa:bb:cc:dd:ee:a2 aa:bb:cc:dd:ee:a3)
machine2=(aa:bb:cc:dd:ee:b1 aa:bb:cc:dd:ee:b2 aa:bb:cc:dd:ee:b3)
machine3=(aa:bb:cc:dd:ee:c1 aa:bb:cc:dd:ee:c2 aa:bb:cc:dd:ee:c3)
machine4=(aa:bb:cc:dd:ee:d1 aa:bb:cc:dd:ee:d2 aa:bb:cc:dd:ee:d3)
machine5=(aa:bb:cc:dd:ee:e1 aa:bb:cc:dd:ee:e2 aa:bb:cc:dd:ee:e3)
machine6=(aa:bb:cc:dd:ee:f1 aa:bb:cc:dd:ee:f2 aa:bb:cc:dd:ee:f3)
That's set and done. Here is how it should look like:
Record:
Point should be at
buf1, at the first line of the data. Let's create the first macro command,save-macsthat saves the information of each entry into registers a,b,c,d:- <f3> to start.
C-SPC then M-f. This mark the word
machine1. Store this word into registerawith C-x r s a.
Move point to the beginning of the first MAC address. C-SPC then C-s and search to the first delimiter, which is an empty space " " in this case. C-b to move back to the end of the first MAC address. Store this region into register b with C-x r s b.
After that, move point to the beginning of the 2nd MAC address, C-s to space and C-b to go back one character. Save the region into register c with C-x r s c.
Repeat for the last MAC address and save it in register d.
- Move point to the beginning of next line.
- <f4> to stop. C-x C-k n and save the macro with the name
save-macs.
Let's create the second macro command,
insert-macs:- Switch to the second buffer with C-x o:
- <f3> to start recording.
Insert the register from
atodaccording to the template:
- After inserting, move point to the next empty line.
- <f4> to stop. C-x C-k n and save the macro with the name
insert-macs.
We have two important macros now. Let's put them back together:
- Switch back to
buf1with C-x o. Point should be on the second entry. - <f3> to start recording.
M-x save-macs; after executing this command, point moves to the next line.- C-x o to switch to
buf2. Point should be after the first insertion ofmachine1. M-x insert-macs; data get inserted into the buffer after this command.- C-x o to switch back to
buf1. - Press <f4> to stop.
Play:
You can play back your new keyboard macro to transform the remaining entries.
Edit Keyboard Macro
| Key | Binding |
|---|---|
| C-x C-k C-e | Command: kmacro-edit-macro |
| Edit the last defined keyboard macro | |
| C-x C-k e name <RET> | Command: edit-kbd-macro |
| Edit a previously defined keyboard macro name | |
| C-x C-k l | Command: kmacro-edit-lossage |
| Treat the last 300 keystrokes as a keyboard macro |
It is useful to edit a keyboard macro when you run an incorrect command. Instead of doing the whole thing again, you can edit the incorrect part. Note that, do not press C-g or you will kill your current recording macro; press <f4> instead to complete the macro, and edit it. After you're done editing, continue from the previous point where you left off with:
- C-u <f3>: Re-execute last keyboard macro, then append keys to its definition.
- C-u C-u <f3>: Append keys to the last keyboard macro without re-executing it.
Interactive Keyboard Macro Editing:
C-x C-k SPC runs kmacro-step-edit-macro that allows you to view
commands of the last keyboard macro, one by one at a time, like a
debugger. When you enter this mode, you have a set of predefined
commands to apply on each command. Press ? for a list of available
interactive commands and play with it.
Tips for using macro effectively
- Find a pattern: after going through all the exercises, you can see that a successful macro is a macro that is repeatable, when a certain condition is met. Basically, for text transformation, you need to create a loop, with proper initialization and end condition. If you data does not have a pattern, try to organize it in a repeatable way. As you can see in the exercises, data are laid out in a way that macro can be repeatable naturally: each line is an iteration.
- You can also use a macro for almost anything unrelated to text in
Emacs. For example, you can create a macro to run
find-fileand to go to~/Downloads. - Use registers: As you see in the exercises, macro is a fine way to store information. You can use registers as a temporary information holder and organize those information into an arbitrary structure later.
- Do it slowly and think before you do: Don't rush yourself. Do it slowly enough that you are sure when you press some keys and execute some commands, it is correct.
- Break large macro into smaller macros.
Version Control
This section is taken directly from GNU Emacs Tour, with improvements.
Emacs helps you manipulate and edit files stored in version control. Emacs supports CVS, Subversion, bzr, git, hg, and other systems, but it offers a uniform interface, called VC, regardless of the version control system you are using. The benefit of a unified interface is that even if you aren't familiar with some version control system (VCS), you can still work with that VCS quickly, without the burden of learning all the little details of a particular VCS.
Emacs automatically detects when a file you're editing is under version control, and displays something like this in the mode line: CVS-1.14 to indicate the version control system in use, and the current version.
M-x vc-next-action or C-x v v commits the current file (prompting you
for a log message) if you've modified it. (Under version control
systems that require locking, this command also acquires a lock for
you.)
VC provides other commands for version control-related tasks:
| Key | Binding |
|---|---|
C-x v = |
Command: vc-diff |
| Displays a diff showing the changes you've made to the current files. | |
C-x v ~ |
Commmand: vc-revision-other-window |
| Prompts you for a version number and shows you that version of the current | |
| file in another window. | |
C-x v g |
Command: vc-annotate |
| Displays an annotated version of the file showing, for each line, | |
| the commit where that line was last changed and by whom. On any | |
line you can press l to view the log message for that commit or d |
|
| to view the associated diff. | |
C-x v l |
Command: vc-print-log |
| Displays a log of previous changes to the file. When point is | |
| on a particular log entry, you can press d to view the diff | |
| associated with that change or f to view that version of the file. | |
C-x v u |
Command: vc-revert |
| Revert working copies of the selected fileset to their repository | |
| contents. This asks for confirmation if the buffer contents are not | |
| identical to the working revision (except for keyword expansion). |
You can list more operations with C-x v C-h.
If you use git, a more specialized package exists dedicated to Git only: Magit offers much better features than the general interface that Emacs provides, except for some features, such as C-x v =, C-x v ~ and C-x v u .
The prefix key bindings for all VC related commands are C-x v. The above are just a few commands that I found most useful and used frequently, even when I use Magit.
Exercise: Let's practice this nice Emacs feature.
- First, download a random Git repository.
- Open any file in the repository.
- Edit that file and save. Do it in various places, so we have many hunks.
- C-x v = to know precise what changes you made.
- C-x v g to view who changes what line on what commit.
- C-x v ~, select a commit. After selecting, the version of that revision will be displayed in another buffer.
- C-x v u to revert the buffer back to its original state, after you done playing with it.
- Rinse and repeat until it becomes part of your workflow.
Shell
In Emacs, you have 3 types of shell commands: shell, term and
eshell.
I will just quote a very good answer on StackExchange:
shell is the oldest of these 3 choices. It uses Emacs's comint-mode to run a subshell (e.g. bash). In this mode, you're using Emacs to edit a command line. The subprocess doesn't see any input until you press Enter. Emacs is acting like a dumb terminal. It does support color codes, but not things like moving the cursor around, so you can't run curses-based applications.
term is a terminal emulator written in Emacs Lisp. In this mode, the keys you press are sent directly to the subprocess; you're using whatever line editing capabilities the shell presents, not Emacs's. It also allows you to run programs that use advanced terminal capabilities like cursor movement (e.g. you could run nano or less inside Emacs).
eshell is a shell implemented directly in Emacs Lisp. You're not running bash or any other shell as a subprocess. As a result, the syntax is not quite the same as bash or sh. It allows things like redirecting the output of a process directly to an Emacs buffer (try echo hello >#<buffer results>).
What is the difference between shell, eshell, and term in Emacs?
I suggest you to use eshell, since you can use any Emacs commands
within Eshell as well. However, in Eshell, to send an interrupt
signal, instead of Ctrl+C, you need to press twice: Ctrl+C
Ctrl+C.
Project: Browsing Linux kernel source code like a pro
Setup
You have learned quite a bit about Emacs. Now, you can immediately use Emacs to do practical thing like jumping around a big source tree like Linux kernel. However, this is just a demo. You can do much more if you learn Emacs properly.
First, you have to install GNU Global.
Linux:
Click here and download the latest stable GNU Global. Then change to the directory where you have just downloaded and follow these steps:
tar xvf global-<version>.tar.gzcd global-<version>/- If you have ctags installed, add the option
--with-exuberant-ctagsand supply the installed path:./configure [--with-exuberant-ctags=/usr/local/bin/ctags] makesudo make install
Windows:
Click here and click "DOS and Windows 32 version" to download the binary archive.
After your download the archive, create a directory C:\root and unzip the package into that folder:

Right click on Computer -> Properties -> Advanced System Settings -> Environment Variables.
If PATH variable does not exist, click New. Then in "Variable Name", enter
PATH; in "Variable Value", enterC:\root\bin. From now on, if you use ggtags, Emacs knows where to find GNU Global programs.$PATHis the variable where Emacs search for executable programs. If you want more executable programs, add more path to $PATH variable. Each path is separated by;like this: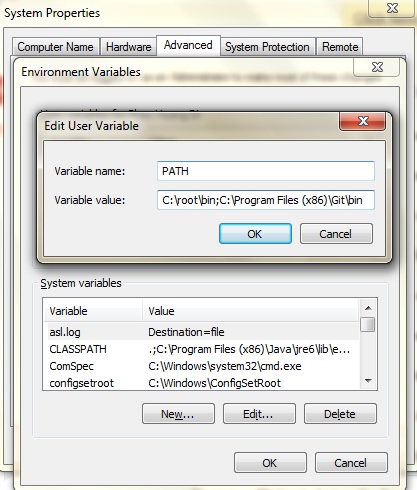
- Mac OSX: Mac OSX version is distributed by MacPorts.
Then, start Emacs, and press C-x b and switch to *scratch* buffer. A
buffer is an editing area; an editing area may or may not has a file
behind it (i.e. A buffer for holding a shell). I will explain more
about this later.
Paste the following code into the *scratch* buffer:
(require 'package)
(add-to-list 'package-archives
       '("melpa" . "http://melpa.milkbox.net/packages/") t)
The above code you see is Emacs Lisp.
Then, M-x eval-buffer and press RET.
After runs eval-buffer, the whole *scratch* buffer is
processed. Then, M-x list-package. Wait a few seconds and you will
see of list of plugins for Emacs. In Emacs, a plugin is called a
package. Press C-s, and type ggtags and press C-s again. Your
cursor will move to the package ggtags. Be sure to select one from
melpa; you should see a column written *melpa and select the row
that has melpa in it. Press Enter to stay at that position. As you
see, C-s is used for searching text inside a buffer.
On the ggtags entry, press i key, which stands for install. Then
press x to execute the installation. Emacs will ask you to confirm
the installation. Type yes and press Enter. Wait for Emacs to
finish its installation.
After installation is done, close the status buffer by pressing C-x
1, switch back to *scratch* buffer by C-x
b. Paste the following code using C-y:
(add-hook 'c-mode-common-hook
    (lambda ()
      (when (derived-mode-p 'c-mode 'c++-mode 'java-mode 'asm-mode)
  (ggtags-mode 1))))
You may worry that you have to write Emacs Lisp every time you install
something. Don't worry. Most package authors provide code snippets to
setup their package properly. All you need to do is copy and
paste. The above code is taken from ggtags homepage at configuration
section. The configuration is meant to activate ggtags only in a few
programming modes.
That's it. Now you can browse kernel easy and fast in Emacs (instant result display).
Browsing the kernel source tree
You can enjoy exploring the kernel source tree by following these steps:
- Clone the kernel source:
git clone https://git.kernel.org/pub/scm/linux/kernel/git/torvalds/linux.git ~/linux C-x d and navigate to
~/linux, then press Enter.
Then, turn on ggtags:
M-x ggtags-mode.- Emacs has a file explorer, as you've seen above, called
Dired, short for(Dir)ectory (Ed)it. - Before start browsing the kernel, you need to create a database for
quick searching. Press
M-x, typeggtags-create-tags. It asks for a directory; since you're in the root directory of Linux already, press Enter;ggtagsasks whether you usectags(which is another tag generating program, works with more languages but has less features). Typeno, press Enter and wait forggtagsto generate the database.

- After the tag database is done generating, a message at the bottom of
your Emacs prints a message
GTAGS generated in ~/linux. Now you can start going anywhere in Linux source tree in an instant instead of spending hours to grep! - Let's find a file in Linux. Every C program, whether large or small
must have a
main()function, and a file containing the function. Let's find out where themain()of Linux kernel is. M-x, typeggtags-find-file. C-c M-f also executesggtags-find-file. A prompt ask for a file to find. You can also invokeggtags-find-filewithC-c M-f.- Enter
main.cto the prompt and press Enter. You will see a list of
main.cfiles below in various directory: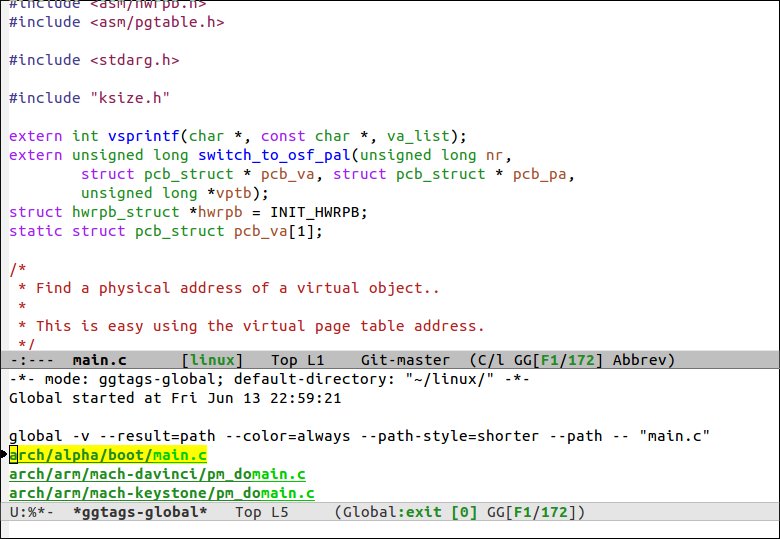
You can visit each file by pressing M-n (n means next) to go down or M-p to up (p means previous).
Press M-s s. A prompt appears waiting for something to search; type
init/main.c. As you type, the candidate buffer got highlighted gradually.- Finally you get into the correct file. This is where Linux starts after the bootloader stage.
Now, you see a lot of names in this file: variable names, function names… Now, you want to find where all of these names are defined and where they are used. Let's scroll down a bit, either with Page Down key or scrolling with the mouse or search for it. If you want to search, press C-s and type
kernel_initand press C-s repeatedly. C-s is available everywhere in Emacs. M-s s is just available in ggtags. You see a function declaration like this:static int kernel_init(void *);
This is the whole process of finding the file:

You can find definitions or references of a tag easily. Now, let's go back to the declaration
static int kernel_init(void *);again. Move your cursor onkernel_init.Press M-. jumps to its definition. M-. again jumps to its references, where the function is called. M-. again jumps to the definition again. Basically, if the current view is definition, pressing M-. switches to references and vice verse. Usually, you will also see a list of candidates similar to the one you saw using
ggtags-find-fileabove. Use M-n or M-p to select next/previous match.If you want to go back to where you were, press M-* (or M-Shift-8) brings you back to the previous place where you jumped.
If you want to jump to a C header file, for example:
#include <linux/kernel.h>
Move your cursor onto that line and press M-..
Again, you can search for candidates using M-s s.
After navigating for a while, you may have jumped to many places. To view the history of where you were, press C-c M-h:
If you want to have a list of all the tags you visited, press C-c M-/. The different between this command and the above command is that, C-c M-h stores the places in files you visited, while C-c M-/ stores the tag operations you performed. After press C-c M-/, if you select an entry in the result list, it displays the result list of the tag in the selected entry, along with your match candidate you selected in the past:

If you create, edit or delete a source file in your project, upon saving
ggtagsautomatically updates the database of your project. How convenient!That's it for basic navigation. Yes, it's just the basic. This is just the tip of the iceberg. In Emacs, you have a toolchain called CEDET, short for
Collection of Emacs Development Environment
  Tools
, which offers features such as highlighting, project, smart jump, context-sensitive completion, symbol references, code generation… And Emacs includes CEDET by default from Emacs 23.2. CEDET is also a language framework for language writers to create such tools within Emacs for their languages, but currently the best supported language in CEDET is C/C++.ggtagssolves your navigation need, but does not offer the above features. However, withggtagsalone, it's far enough for your C/C++ projects, thanks to GNU Global for working nicely on large source tree like the Linux kernel.. After all, many people write C/C++ source code on a bare minimum editor and waste a lot of time doing things manually instead of focusing on their problems.After this demo, are you convinced now? If you want to harness the power of Emacs even further, you need to learn Emacs properly. Finally, close everything you don't need with C-x k
Extending Emacs Primer
To let Emacs automatically load your configuration, save it to either of these three files:
~/.emacs
~/.emacs.d/init.el
~/.emacs.d/init
Now you know how to open and save files, it's time to save your Emacs
configuration you have been using in the *scratch* buffer. After you finish
the Linux kernel browsing project, you have these configurations:
(require 'package)
(add-to-list 'package-archives
       '("melpa" . "http://melpa.milkbox.net/packages/") t)

(add-hook 'c-mode-common-hook
    (lambda ()
      (when (derived-mode-p 'c-mode 'c++-mode 'java-mode 'asm-mode)
  (ggtags-mode 1))))


(add-hook 'dired-mode-hook 'ggtags-mode)
If you like Ido, put the following configuration inside your
init.el:
(setq ido-enable-flex-matching t)
(setq ido-everywhere t)
(ido-mode 1)
You should use ~/.emacs.d/init.el because you can upload your
~/.emacs.d along with init.el on GitHub or Bitbucket, and it's
more organized since Emacs saves many things under ~/.emacs.d/.
The steps:
- Create a new file
~/.emacs.d/init.elwith C-x C-f. After this, the buffer is created for this new file. - M-w (copy) the above code snippet from
*scratch*buffer and C-y (paste) into theinit.elbuffer. - C-x C-s to save the buffer into file.
- Restart Emacs and test if it is effective. Try
list-packageto see if melpa is available. Try M-. in any source file in your linux kernel directory to see if it works properly.
Conclusion
That's it. Now you can start using Emacs for many things, from editing source code to managing files and reading documentation. I hope you find my manual useful for helping you get the hang of Emacs in as little time as possible, and I am really help if you do.
Remember, this is just the tip of the iceberg. There are more things Emacs is capable of. If you like, follow my other Emacs manuals on specific topics.
Finally, thanks to Worg for this awesome CSS.
Appendix
Why Emacs? (Extended)
Emacs allows you to do much more than just editing. Emacs is not a mere editor like others, either in terminal or in GUI. Emacs is a development platform. Emacs is a virtual machine that interprets its own bytecode.
You can write all sorts of programs in Emacs to add more features using its own language - Emacs Lisp - in an easy way. With this extensibility, Emacs can be many things: an editor, a file manager, an email client, a news reader, a shell…
You can think of Emacs as an enhanced interpreter and evaluate any valid Emacs Lisp code anywhere in Emacs, as long as the code is visible on your screen. To illustrate my point, here is an example:
(defun hello ()
  (interactive)
  (message "Hello World"))
You can paste that code snippet anywhere - yes, anywhere - in Emacs and tell Emacs to execute that code. If the code snippet has valid syntax, Emacs executes successfully and you will have command to print "Hello World" at the bottom of screen.
A great advantage of this approach is, if you want to change the behaviour of Emacs, you write some Emacs Lisp code, execute it and immediately see the results, right inside Emacs. Emacs is beyond an editor. Emacs is a programming platform that has an editor. Don't confuse Emacs with other real editors, which can only be used for editing.
In practice, Emacs also offers many editing interfaces: built-in Emacs, Ergoemacs and Evil - or Vim inside Emacs - key bindings. Emacs has internal tools and interfaces to external tools for many programming languages. Learning Emacs means you can use the same editor for different languages. Otherwise, you will have to learn a different editor when you learn a random language.
Other people's "Why Emacs?"
"Why Emacs?" by Fabrice Popinea. He is the maintainer of Emacs 64 bit on Windows.
"Why Emacs?" by Bozhidar Batsov. He is the author of Emacs Prelude, an Emacs distribution with convenient packages for new people to get start with Emacs.
Why I use Emacs by Vincent Foley-Bourgon.
Why I Still Use Emacs, also by Vincent Foley-Bourgon.
More on Emacs history
Ever heard of a computing system called Lisp Machine? I bet many of you don't. Me, too, until I started using Emacs and gradually learned enough to know such a thing ever existed. This old article is an interesting read: The Ghost in the Lisp Machine
A friend of mine used to say that Emacs fills our yearning for a Lisp Machine. I tend to agree with him: Emacs is not just an editor, but a full integrated environment where you can perform virtually any imaginable task; and, most importantly, the inner workings of the system are open to you to explore and extend. Using, for extra fun, Lisp. No, i don’t think that Elisp is the nicest Lisp incarnation around, but is far better than, say, C, and i still prefer it to other scripting languages. Moreover, the awesome range of libraries at your disposal makes up for many of the deficiencies in the language.
Living in Emacs is addictive. Imagine an operating system where you can switch from writing code to browsing the web or chatting without leaving a consistent environment, with the same set of commands and shortcuts. Imagine a set of integrated applications where data is seamlessly shared, where any single functionality can be tweaked, extended and adapted to your particular needs. Where everything is easily scriptable. Imagine, in addition, that the environment provides powerful and complete interactive self-documentation facilities with which the user can find out what is available. I have yet to find an operating system providing such an integrated environment. Not even Mac OS X, where AppleScript support is often lacking and system services are underused.
Of course, the key ingredient here is Emacs’ extensibility. Far from being an afterthought or simply one of its features, extensibility is the central aspect of Emacs’ architecture. Actually, the whole point of this post is to recommend you reading Richard Stallman’s 1981 essay EMACS: The Extensible, Customizable Display Editor, which explains much better than I could the strong points of Emacs design, i.e., those traits that make Emacs more, much more, than just an editor. From the horse’s mouth:
Extensibility means that the user can add new editing commands or change old ones to fit his editing needs, while he is editing. EMACS is written in a modular fashion, composed of many separate and independent functions. The user extends EMACS by adding or replacing functions, writing their definitions in the same language that was used to write the original EMACS system. We will explain below why this is the only method of extension which is practical in use: others are theoretically equally good but discourage use, or discourage nontrivial use.
[…]
User customization helps in another, subtler way, by making the whole user community into a breeding and testing ground for new ideas. Users think of small changes, try them, and give them to other users–if an idea becomes popular, it can be incorporated into the core system. When we poll users on suggested changes, they can respond on the basis of actual experience rather than thought experiments.
The article goes on explaining the organization of the Emacs system, how it depends on its interpreter, Elisp’s main features and how built-in self-documentation is provided. Also interesting is the list of related systems at the end of the essay: Lisp machines, LOGO, MacLisp and Smalltalk. We’re definitely in good company!
Emacs is a miniature of a Lisp Machine. You can take a tour at the Lisp Machine online museum.